 | Coloring a point cloud using 3DF Zephyr Pro
Welcome to the 3DF Zephyr tutorial series. In this recipe you’ll learn the workflow needed in order to apply coloring to an arbitrary point cloud using a Zephyr generated point cloud. This tutorial can not be completed with 3DF Zephyr Evaluation and this feature is available since 3DF Zephyr Pro v1.400 This tutorial is very old as it is for Zephyr 1.x – please check the newest tutorials here |
- Step 1 – introduction
3DF Zephyr can be used as an additional tool to aid other scanning equipment: in all those scenarios where you are obtaining a non-colored dense point cloud (for example using laser scanning technology) you can use the “import and color point cloud” tool to keep the input point cloud and just coloring it with the help of 3DF Zephyr Pro.
In this example, we are going to use the Duomo of Pisa dataset (courtesy of Visual Computing Lab) which consists in a set of pictures and a 3DF Zephyr Pro generated point cloud (which is colored, but is less accurate than a laser scan) and a laser scan of the same subject (which by nature is more accurate, but lacks coloring). We are going to import the latter into 3DF Zephyr, set its reference to be consistent with the pictures-generated dataset and then color the laser scanned point cloud.

Inside the .rar file you will find:
| Dataset | within this directory, all the pictures required to recreate the ZEP file from scratch. |
| DuomoPisa.zep | ZEP file with the Duomo of Pisa reconstruction |
| Abside_scan.ply | Duomo of Pisa point cloud obtained via laser scan |
| Abside_colored.ply | Output of this tutorial. The laser scanned point cloud colored using the Zephyr reconstruction. |
- Step 2 – Importing the point cloud
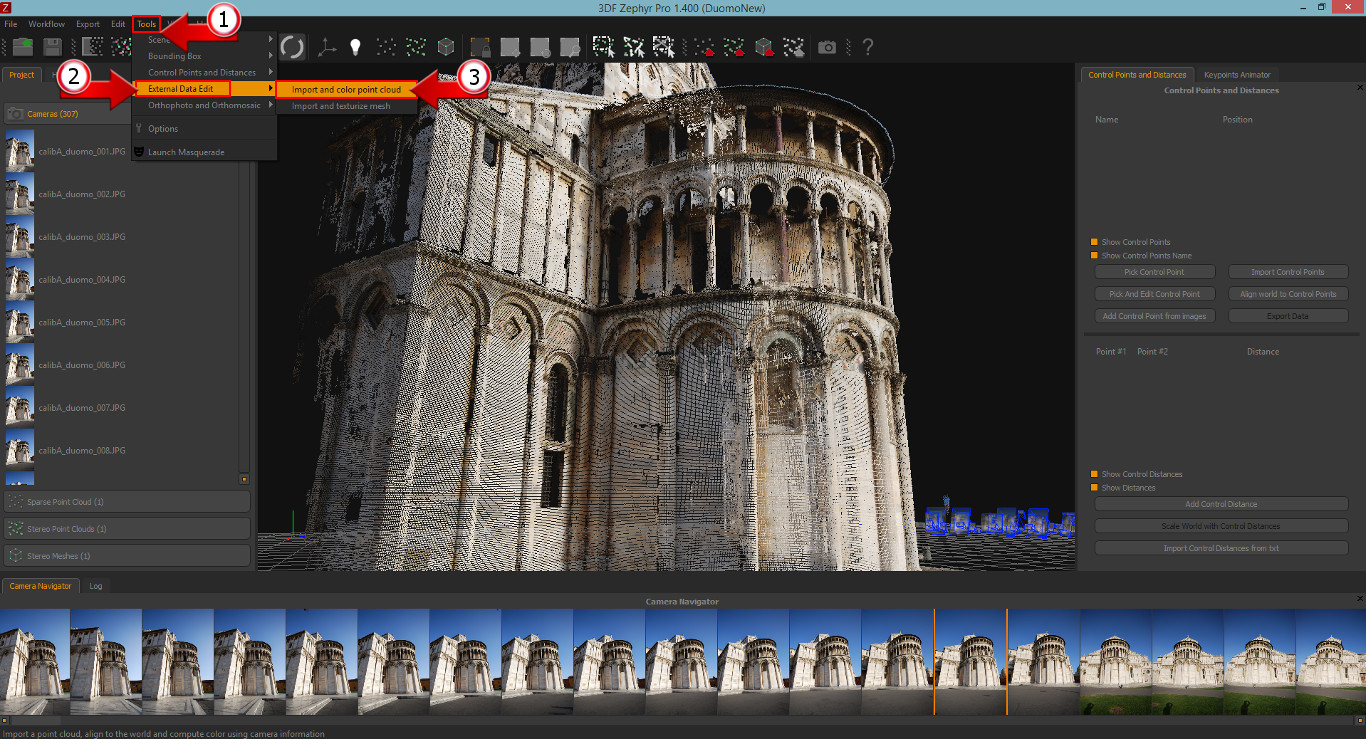  | Process the dataset until you get at least a dense point cloud (or use the .zep file you downloaded) . You can also clean the resulting dense point cloud with the in-zephyr tools. When you are ready, you can import the non-colored dense point cloud (the target point cloud). To import the target cloud, simply click on the “Tools” Menu (1), select “External Data Edit” (2) and then click on “Import and color point cloud” (3). As you can see, the import will fail unless you picked at least three control points. Try to pick easily recognizable points (which must exists on both the Zephyr reconstruction and your target point cloud): usually edges are a good choice. You’ll understand the significance in step 3. Once you have picked at least three control points, repeat the “import and color point cloud” step. The “Color point cloud” Window (4) will appear. Click on the “Import point cloud” (5) Button, browse and select the target point cloud (abside_scan.ply) you want to import into Zephyr. When the import phase has been completed, a point cloud (6) will appear in the Zephyr Workspace. Note that the scale, rotation and translation of the imported point cloud will most likely be off: in order to colorize the point cloud, another step is required, in which we map the control points from the zephyr workspace to the target point cloud. |
- Step 3 – Control points mapping
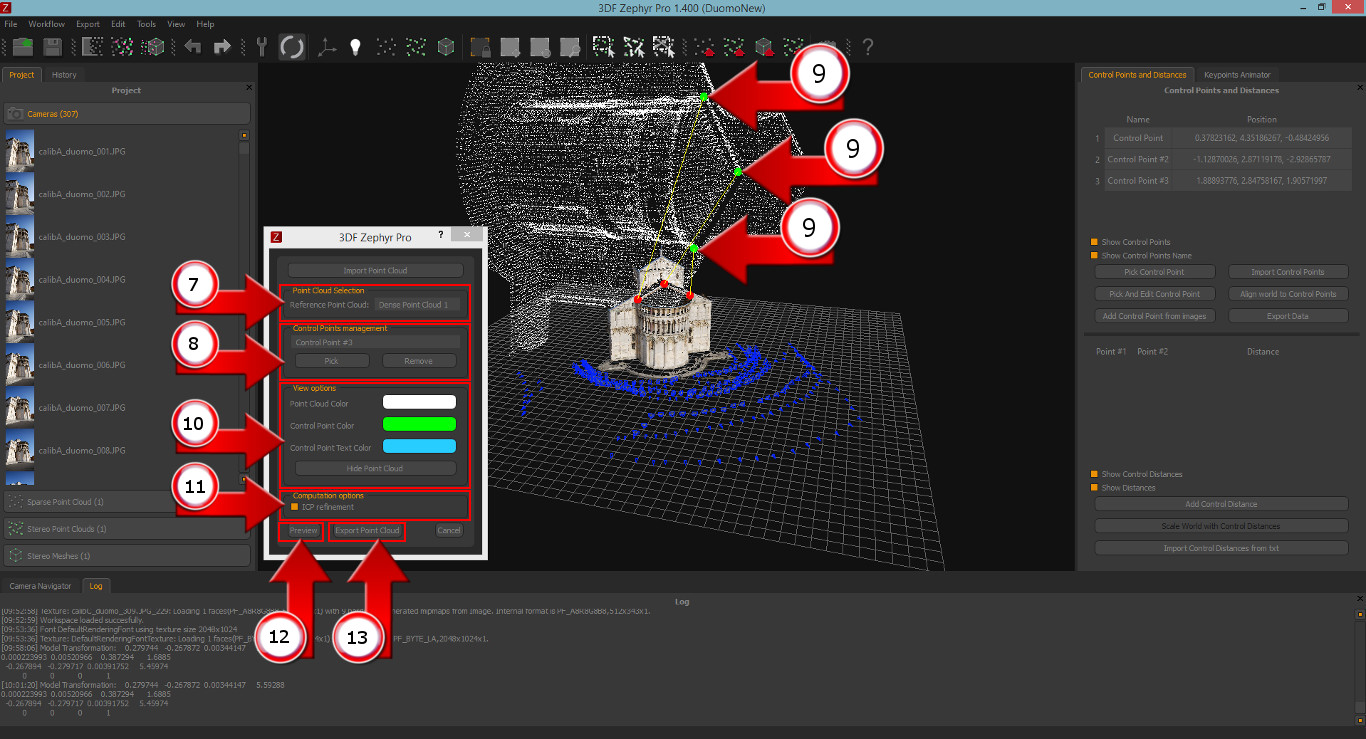 | Once you have selected your desired reference point cloud from the “Point Cloud Selection” section (7) you must pick the same areas you picked in step 2 using the imported point cloud (6) as a target. You can use the “Control point management” section (8) to select, pick and remove control points which will be rendered and connected to their respective control points with a line (9). You can change the rendering settings with the controls in the “View Options” section (10). This step is critical and is prone to human error: Zephyr will however offer you an option to automatically adjust the selected control points to get the best accuracy possible (however, the computation time will increase). If you’d like to use the ICP refinement (reccomended), simply keep it selected in the “Computation options” section (11). You can then see a preview by clicking the preview button (12) or export the colored point cloud with the export button (13).
|
- Final notes
This tool is very helpful for those professionals who are required to do laser scans but would also like the possibilty to color the obtained point cloud. With Zephyr, this process takes only a few minutes and is the perfect way to enhance the laser scanning workflow.
By following this tutorial, you should have obtained something similar to this output:
