3DF Zephyr Photography guide
This guide is an excerpt from the 3DF Zephyr documentation. You can find this guide in the in-application manual or as a free PDF at https://www.3dflow.net/technology/documents/3df-zephyr-tutorials/
In this section we will list some tips to obtain good reconstructions. 3DF Zephyr is completely automatic but does require some forethought to produce the best results.
You may also watch our 3Dflow Academy videotutorial below:
To achieve the best results with 3DF Zephyr, please follow these general guidelines while acquiring your dataset.
Choosing the best camera for your needs
What you’d better keep in mind when picking your gear:
Camera sensors.
camera performance is not provided by its megapixels resolution;
high-end cameras do not always lead to better result;
A good camera must allow a full light management in order to control each exposition value. That’s why DSLR cameras (reflex) are usually recommended even if both mirrorless and bridge camera can fit that need.
Camera sensor is the real highlight of the matter and the following hints could be quite helpful:
Pixels size must be higher than 2 µm; therefore it is strongly recommended to exploit camera sensor bigger than 1/2.3″ even if smaller sensors may be used depending on the accuracy you want to reach;
You’d better draw your attention to pixels size rather than pixels mount for each picture. For instance, if a 36 megapixel full-frame reflex (35.9 x 24 mm) is being employed it is worthwhile to shoot at a lower resolution than the maximum provided. That is the way to get bigger pixels in the images even though less;
Lenses.
Every survey has its own features and conditions so choosing the most suitable lens for that depends on both environment status (light, obstacles on field, user movement capability) and features of the survey subject/scene. Following a few tips are provided so as to pick the proper photographic gear:
Full-frame cameras: use lenses with focal length value between 25 and 50 mm;
Aps-c cameras or lower sensor size: use lenses with focal length value between 18 and 35 mm considering a crop factor value between 1.5 e 1.6;
It is strongly recommended to shoot keeping the same focal length for all the pictures you take. Even if Zephyr can handle several kind of cameras and lenses at the same time and in the same project, you can get better and faster results if working with an equivalent set-up;
Shooting techniques
Following some proposals for standard photographic acquisition are featured. At any rate survey modalities are different and need to be adapted on a case by case basis.
Parallel axis capture

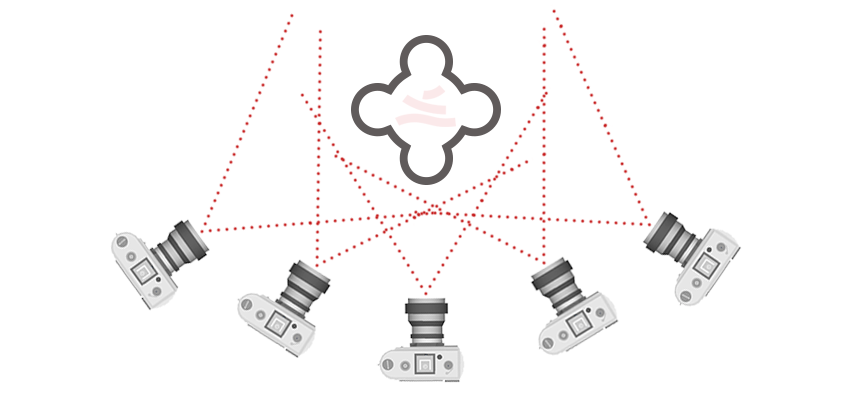
General rules
Keep the subject on the center of the framing;
Avoid direct light sources that may cast shadows and hide surface areas;
Avoid high ISO value since the noise may set back the Structure from Motion phase in Zephyr;
Keep a high aperture value (f/8 – F/16) when possible as it helps get a deep depth of field on pictures;
Avoid blurry photos. Using good quality cameras and having a good illumination can help. Consider also using a tripod if necessary.
Have a lots of overlap on each photo (70-80%). This is probably the most important tip. Shoot as many photos you can. Each part of the scene you’re shooting should appear in at least three separate views taken from different locations. This is a minimum requirement, taking more photos will likely improve the final results.
Limit the angles between photos. When moving around objects, try to keep the angle between each photo very low.
Shoot scenes with lots of detail and texture. The visual texture in the photos is what ties them together. 3DF Zephyr does not work well with uniform or highly repetitive texture and does not work at all with specular or transparent objects. You can, however, mask out certain areas using 3DF Masquerade (bundled with 3DF Zephyr)
Don’t try to adjust lens distorsion as that error is quite essential during the first phase of Structure from Motion;
Even if 3DF Zephyr can deal with different cameras or lenses within the same dataset, you will obtain better results by using the same camera with the same focal length.
Be redundant: the more photos you take, the better results you will get.
Remember that you can even use the Image Quality Index inside Zephyr to check the status of the pictures you are working on.
- If you are using Zephyr in an aerial (UAV) photogrammetry application it is very likely that you already implement a standard procedure with (at least) 60% forward overlap and (at least) 30% side overlap. This is perfectly fine for Zephyr.
- If you are using Zephyr to capture an object by moving around it (like a statue) we suggest you to take several orbits around the object at different heights. This indeed can be seen as a special case of the aerial photogrammetry application, where the orbit plays the role of the strip. If the acquisition follows a strict planning, you can apply the same rules as in the aerial case. Otherwise, as a rule of thumb, 3 orbits of 24 images each will typically suffice.
- If you are using Zephyr in a urban scenario (like a square or inside a hall), we suggest the following procedure. Choose 2 or 3 spots in the square and take a panoramic sequence of pictures from each spot (ensuring the usual 60% overlap). Then sweep all the facades (or walls) from a distance that allows to frame the whole facade height, and with a 60% side overlap. If you need higher resolution you can do multiple close-up sweeps, ensuring to cover (with overlap) the whole facade height.
- In all the other scenarios the general rule is to allow for sufficient overlap (60% as a rule of thumb, the more the better) and for a sufficient baseline length (the point from which you shoot must vary).
- Using the same camera objective without changing the zoom setting, while not mandatory, can significantly improve the autocalibration phase.