If you picked this method from the tutorial introduction to FlowEngine on AWS, it means you are going to use your own FlowEngine license (full or free) to create your own docker container. You will be able to entirely customize the flow and what the application does.
If you do not want to purchase a full flowengine license or develop your own container, but just required basic reconstruction capabilities on the cloud, make sure to check the other method that features a pay-as-you-go method using a pre-built container.
Setting up your amazon credentials
Before we start, we should configure our amazon credentials. Make sure to create a proper account in Amazon IAM, then log into your development machine and install the Amazon CLI if necessary. After you have created your access key, authenticate using the command:
$ aws configureFollow the on-screen prompt to configure the tool. Your credenetials will be stored in ~/.aws/credentials
We will be running a task on an ECS cluster, so we first must setup the appropriate IAM roles. We will create an IAM “service role” for the task role and execution role, then with the role applied, the task will have access to AWS resources specified in the policy. This decouples permissions from a specific user account, they can be updated on the fly, and most importantly it avoids passing around plain text credentials. There are two roles for the tasks to be aware of:
The “Task Execution Role”: this role is required by tasks to pull ECR containers and publish CloudWatch logs. The console can auto create this role and will assign this managed policy: AmazonECSTaskExecutionRolePolicy
The “Task Role”: this is the role that will provide access in place of your AWS credentials. It is likely that you will want a managed policy such as AmazonS3FullAccess unless you plan to move your data to and from your container in a different way.
Creating a Docker Container
Our docker container will be based on the cuda:10.0-base image as we need Cuda 10.x for the current version of FlowEngine. We will be building the latest FlowEngine build (5.019 at the time of writing) so we will need to include some files in our Docker Container:
- FlowEngineFreeLinux64_6502.zip – the FlowEnginelibrary and example source
- cmake-3.23.2.tar.gz – the cmake tools suite required to build FlowEngine
- ImageMagick.tar.gz – the ImageMagick library, required to build flowengine
Create a directory in your development PC which will hold these files
$ mkdir dockerAppAnd copy the above files in that directory, as we will need to deploy them in the docker container
$ mv /your/path/to/FlowEngineFreeLinux64_6502.zip ./dockerApp/FlowEngineFreeLinux64_6502.zip
$ mv /your/path/to/cmake-3.23.2.tar.gz ./dockerApp/cmake-3.23.2.tar.gz
$ mv /your/path/to/ImageMagick.tar.gz ./dockerApp/ImageMagick.tar.gz
We will create a docker container that will launch a customizable series of commands, a bash script. We will start with a simple one that does nothing, which we will call FlowEngineRunner.sh
#!/bin/bash
echo "Hello from a docker container!"
Either copy and paste that content or download FlowEngineRunner.sh from here and copy it in your dockerApp directory. Make sure to make it executable too.
$ mv /your/path/to/FlowEngineRunner.sh ./dockerApp/FlowEngineRunner.sh
chmod +x ./dockerApp/FlowEngineRunner.sh
Now we need to create the DockerFile (the instructions that docker requires to create the container itself).
FROM nvidia/cuda:10.0-base

#The following arguments must be passed with env variables with -e if you choose to run them manually
#otherwise they can be passed and overridden at task/level from the AWS environment

#Project data
ARG S3BUCKET
ARG PROJECTNAME

#This scripts expects all data (img and xml) as project/project.zip on the S3 bucket
#and will output as project/workspace.3dk

#define working directory
ARG WORKDIR=/usr/inst/app
WORKDIR $WORKDIR

#update the image
RUN apt-get update && apt-get install -y build-essential

# copy archieved sources in the docker installation
# This DockerFile assumes you have the following files
#       FlowEngineFreeLinux64_6502.zip
#       cmake-3.23.2.tar.gz
#       ImageMagick.tar.gz
#       FlowEngineRunner.sh
COPY . .

# build cmake
RUN     tar -zxvf cmake-3.23.2.tar.gz &&\
        cd cmake-3.23.2 && \
        ./bootstrap && \
        make && \
        make install

# build imageMagick
RUN apt-get install -y libpng-dev libjpeg-dev libtiff-dev && \
        tar -xvf ImageMagick.tar.gz && \
        cd ImageMagick-7.* && \
        ./configure --with-quantum-depth=16 --enable-hdri=yes && \
        make -j8 && \
        make install && \
        ldconfig /usr/local/lib/

#Depending on your environment, make sure the compiled library is actually used if you have multiple versions installed
RUN ln -s /usr/local/lib/libMagick++-7.Q16HDRI.so /usr/local/lib/libMagick++-7.Q16HDRI.so.4
RUN export LD_LIBRARY_PATH=/usr/local/lib

# build FlowEngine
RUN apt-get install -y unzip && \
        unzip FlowEngineFreeLinux64_6502.zip && \
        cd FlowEngineFreeLinux64_6502 && \
        mkdir build && \
        cd build && \
        cmake -DCMAKE_BUILD_TYPE=Release .. && \
        make && \
        make install


#install pip to download the amazon cli and unzip as it will be later needed to unzip the content from the S3 bucket
RUN apt-get install -y python3 python3-pip unzip
RUN pip3 install awscli

#this is the command that our docker container will run upon being launched. It requires no arguments, as we will pass them via environment variables
CMD ["./FlowEngineRunner.sh",""]
Either copy and paste that content or download DockerFile from here and copy it in your dockerApp directory.
$ mv /your/path/to/DockerFile ./dockerApp/DockerFileDownload or create the following buildDockerImage.sh
#!/bin/bash
cd dockerApp
image=flowenginefreetest:latest
docker build -f Dockerfile -t ${image} .
Make it executable and run it
$ chmod +x buildDockerImage.sh
$ ./buildDockerImage.sh
Docker will now create your container. Note that this approach will everytime unpack and re-build flowengine everytime you modify your DockerFile. If you already have a redistributable binary (for example, in the form of a .deb file) of your FlowEngine project you should probably simply use that to quickly deploy your solution on docker.
Now that the image is ready, we can test it on our development machine before we upload it to AWS
$ docker run flowenginefreetestSince our FlowEngineRunner.sh script currently only has an echo, our container will simply output
Hello from a docker container!That is perfectly fine for now: we have built our container with all the required dependencies so we can now write a more complex FlowEngineRunner.sh script, which will download the photos from S3, unpack them, process them, anad upload the result back to S3.
Automating FlowEngine
Lets extend our FlowEngineRunner.sh functionality. For this tutorial, we are expecting all the required content in an S3 bucket, all zipped, in an archive with the same name of its root project. Our Script will
- Cleanup temporary directory (although in most cases you will probably spawn and delete a container, in which case this step will be useless)
- Copy the data from an S3 bucket into a local directory (you will have to upload this data manually to your bucket, or, ideally in your production environment, via an automated system such as an application, be it web, desktop, mobile or something else)
- Unpack the data so that the FlowEngine example can run (it requires the photos to be into an Images directory)
- Run FlowEngine
- Copy the output from the local directory to the S3 bucket
So lets modify our FlowEngineRunner.sh file with the following content (or download the updated FlowEngineRunner.sh file here)
#!/bin/sh

#The following environment variables must be set
#$S3BUCKET
#$PROJECTNAME

echo "Running Project: $PROJECTNAME on bucket $S3BUCKET"
rm /usr/inst/app/Default.xml

echo "Copying Data from bucket: $S3BUCKET"
aws s3 cp s3://$S3BUCKET/$PROJECTNAME/$PROJECTNAME.zip ./
unzip ./$PROJECTNAME.zip -d  /usr/inst/app/Images
mv /usr/inst/app/Images/Default.xml /usr/inst/app/Default.xml

#Make sure to activate FlowEngine here if you are using a non-free version.
#Make sure to have a floating license or a license with unlimited de/activations. Reach out to support@3dflow.net for more help
#Remember that all the full FlowEngine licenses, by default, have a limited amount of actvations and cannot be activated on Virtual Machines.
#Hence, you may need to contact support before you want to do this.
#FlowEngineLicenser activate XXXX-XXXX-XXXX-XXXX-XXXX-XXXX

echo "Running FlowEngine..."
./FlowEngineFreeLinux64_5019/redist/ExampleBasic Default.xml

#Make sure to de-activate flowengine here when necessary
#FlowEngineLicenser deactivate

echo "Copying output..."
aws s3 cp /usr/inst/app/Export/workspace.3dk s3://$S3BUCKET/$PROJECTNAME/workspace.3dk
Since we have changed the file that needs to be packed in the container, we need to rebuild the container
$ ./buildDockerImage.sh
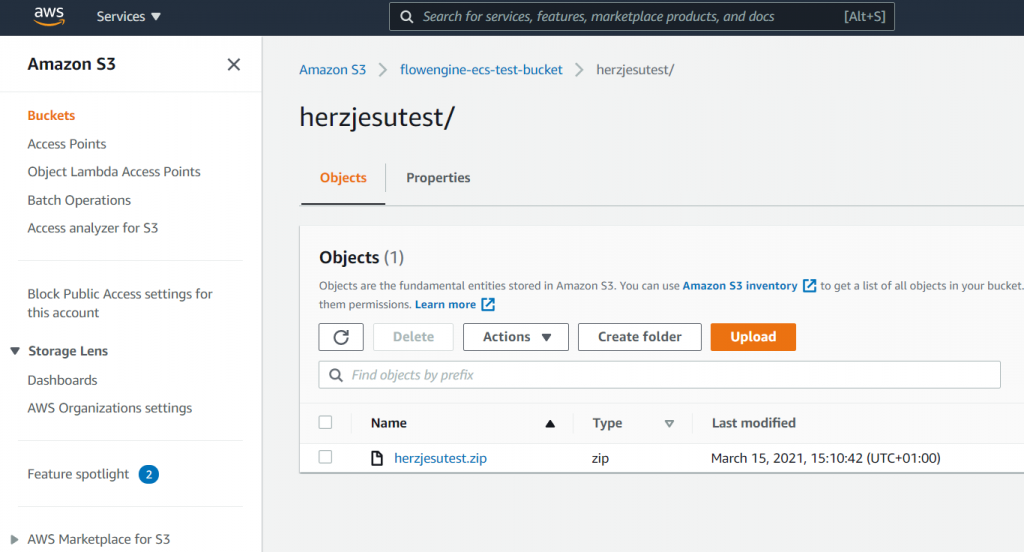
Create a test project with at least three photos and the settings file and zip them together (or you can use this very lightweight sample here) and put it in your desired S3 bucket, in my case, ‘flowengine-ecs-test-bucket’ (note that bucket names are unique so you will likely have to come up with your own bucket name). If you are uploading your data via the web interface, your S3 interface should look like this
Run your docker container once again – however this time we will need to pass certain enviroment variables (which we declared back at the beginning of the dockerfile) so that they can be accessed by our FlowEngineRunner.sh script.
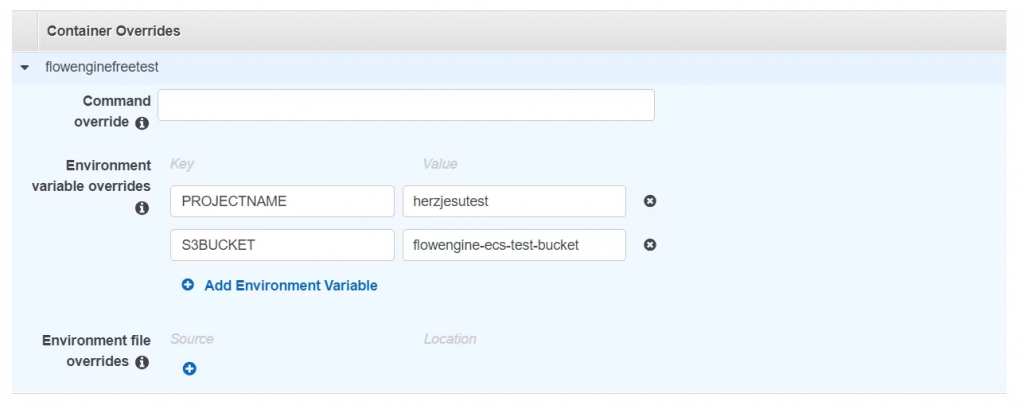
$ docker run --env PROJECTNAME=yourprojectname --env S3BUCKET=your-test-bucket --gpus=all flowenginefreetestPROJECTNAME in this tutorial this value is herzjesutest as our data will be uploaded to a bucket as herzjesutest/herzejustest.zip
S3BUCKET in this tutorial this value is flowengine-ecs-test-bucket although you will have to match it to your own bucket name
–gpus=all is required in order to have your container use all the available CUDA GPUs on the host system
The container now has all the required information to interact with the S3 environment and after running the reconstruction in flowengine, the resulting .3dk will be uploaded to S3. Your can then access your .3dk from the web interface or interact differenetly in your solution to handle the output. Note how in this example, we assume the S3 bucket to be in the same region of the running tasks. You can specify a different region using the –region option when calling aws s3 cp
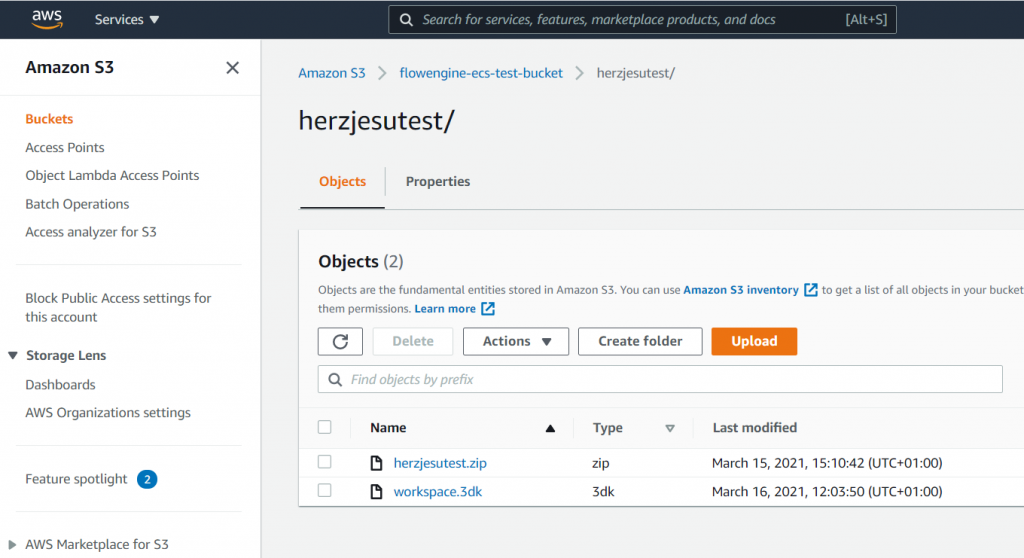
The next step is now to upload the docker image into Amazon’s cloud so that we then can create an ECS cluster and run that container directly.
Pushing the docker image to ECR
Before we can push the docker image to ECR, we first need to create a repository on ECR – your interface should look like this:

You can see the push command by clicking the ‘View Push Commands’ button, however you can modify the following script, pushDockerImage.sh to automate the full process:
#!/bin/bash
# push the following docker container image to ECR , this assumes the calling
# process is authenticated to your AWS account and has the appropriate IAM
# permissions

# you must have configured your aws cli already with the command "aws configure"

account_id=$(aws sts get-caller-identity --query Account --output text)

#Change your image name accordingly
image=flowenginefreetest:latest

#Change your region here accordingly
region=eu-west-1

# get ECR login credentials (assumes we're authenticated to do so with the account # provided)
aws ecr get-login-password | sudo docker login --username AWS --password-stdin ${account_id}.dkr.ecr.${region}.amazonaws.com
# tag local image with aws convention
sudo docker tag ${image} ${account_id}.dkr.ecr.${region}.amazonaws.com/${image}
# push to ecr
sudo docker push ${account_id}.dkr.ecr.${region}.amazonaws.com/${image}
Make the script executable and then run it to push the image in your repository
$ chmod +x pushDockerImage.sh
$ ./pushDockerImage.sh
You should now see your image uploaded in the repository:

Creating a task on ECS
Before we can run the container on an ECS cluster, we must first define the task on ECS itself. Log into your ECS console and from the left menu click ‘Task Definitions’ and select ‘Create new Task Definition’

In this tutorial we are going to use’EC2′ as task type, but of course pick Fargate if your production environment will be set differently. Click Next step and then fill the form accordingly to your resources needs and make sure to set the correct image in the format repository-url/image:tag
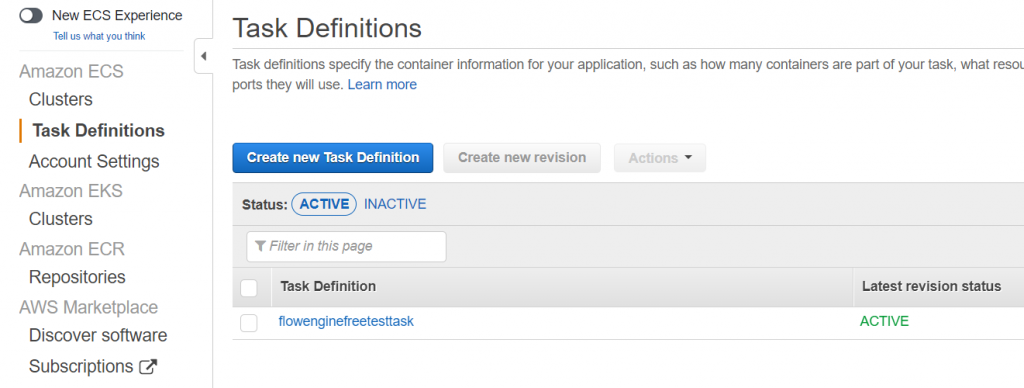
Once you have created your task, it should be listed correctly in your amazon interface (keep in mind tasks are listed region-based):
Creating a Cluster on ECS
Now that the task has been set, we can finally create the actual cluster. Click ‘Clusters’ from the ECS left menu and then ‘Create Cluster’

Select ‘EC2 Linux + Networking’ and click ‘Next step’ – complete the form with appropriate values making sure you are picking a GPU accelerated instance (for example, at the moment of writing, g4dn.xlarge) and then click ‘Create’. Make also sure to select an appropriate key pair or you won’t be able to SSH in your cluster, if the need arise. Everything else (Security group, VPC, etc) must be setup accordingly to your production environmenet needs which this guide won’t cover.
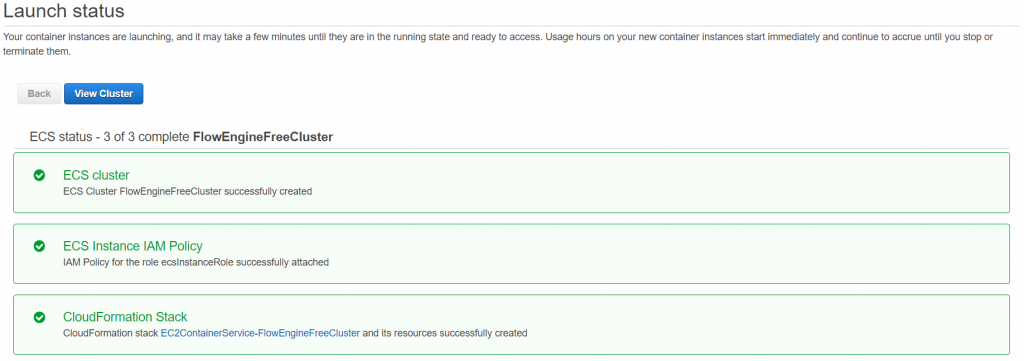
Wait a few moments while the cluster is setting up – you will get a confirmation message – keep in mind the cluster will start running and accrue costs immediately:
You can now interact with the cluster from your enviroment so that tasks are queued according to your needs. However, lets manually run a task so that we can test our solution: click the ‘Task’ tab on your newly created cluster view and pick ‘Run new task’:
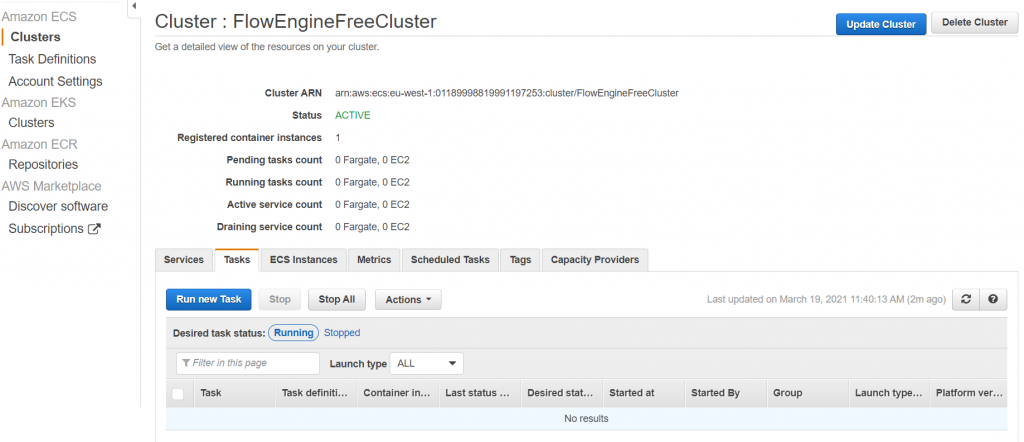
When defining this test-task however, after selecting the right task (our previously defined one) we will also need to override the environment variables required by our container according to your needs, for example to specify a bucket and project (like we did before) and depedning on your needs, the AWS credentials too – so click advanced and expand ‘Container overrides’ on the task and add the required fields:
Click ‘Run task’ after setting up the rest of the required fields and your task will be queued and run immediately:

What’s next?
Now that you have a working cluster and container, it is up to you to write a scalable and elastic solution on AWS. Advanced users can also consider using Kubernetes on an Amazon EKS cluster or the serverless AWS Fargate solution.


