Tutorial #07 : how to convert movies in 3D models with 3DF Zephyr
Using movie files as input
Welcome to the 3DF Zephyr tutorial series.
In this recipe, you will learn how to use movies instead of pictures as input for 3DF Zephyr.
Step 1 – Getting ready
Given a movie, Zephyr will extract a certain number of frames per second and dump them on your hard disk (this is necessary so you can save your workspace without having to re-extract frames from the movie each time you load the dataset). Obviously, given the nature of movie files, a high-resolution, possibly non-blurred video stream is required in order to feed Zephyr meaningful data.
For this tutorial, feel free to use your own movie file or you can download a sample file below, a small capture of a carved stone art piece (Christoph Angermair – Golgotha, 1631). The better the movie quality, the better the results. However even smartphone-recorded videos will work as long as they are shot with a decent resolution and focus.
| Download Dataset – Angermair video (74.9MB) | |
| Download Dataset – Angermair .Zep (283MB) |
Step 2 – Adding a movie to a workspace
As usual, create a new project from the Workflow Menu.
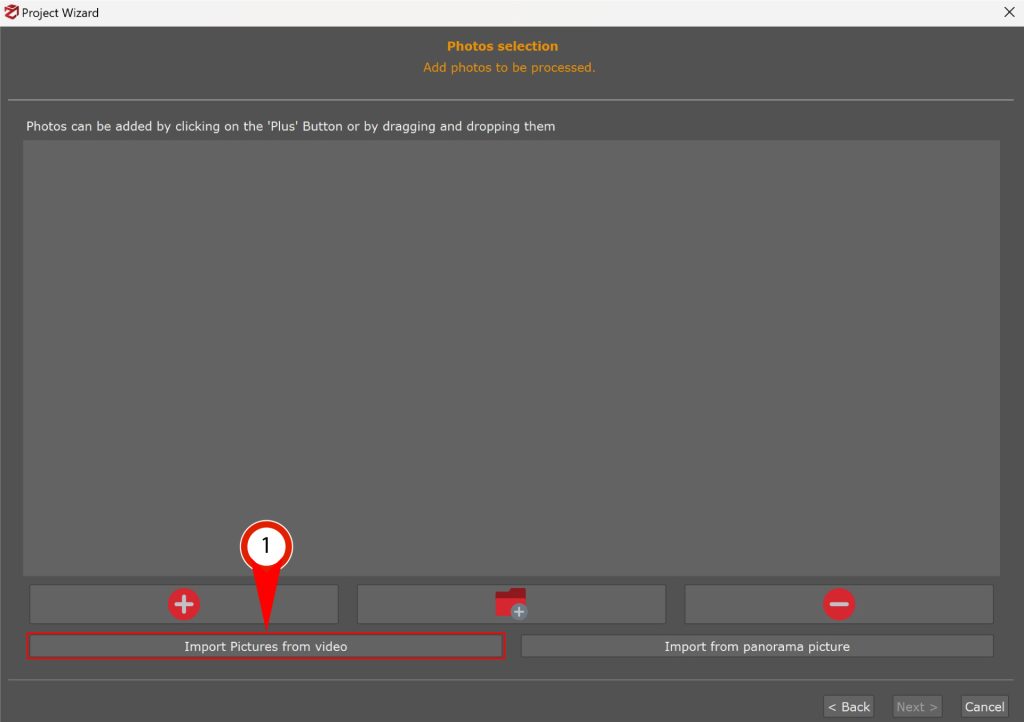
Click Workflow > New Project > Next and the “Import pictures from video” button (1) will appear in the Project Wizard window.

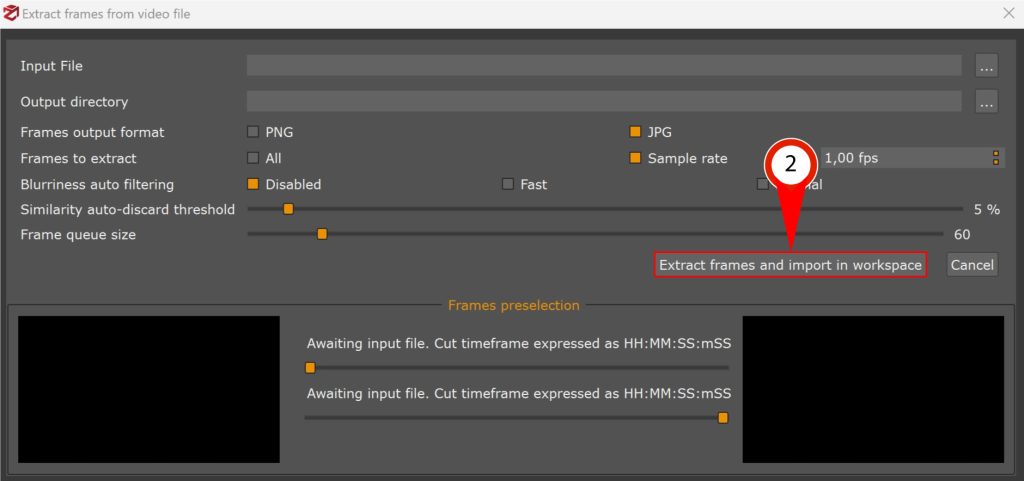
Click the button and the “Extract frames from video file” window will pop up.
Click on the “…” button to browse for your input file and pick an output directory for the extracted frames if you wish (otherwise, frames will be dumped in the same directory in which the input file resides).
do not use watermarked videos;
do not use videos where a certain object is always obstructing the view;
do not use too blurred videos or low-resolution videos;

When ready you can click the “Extract frames and import in workspace” button (2) to start the video processing: the default settings should work for most well – shot videos. You can then proceed normally, by adding and/or removing photos (or other frames from other videos) with the Zephyr pipeline.
Given the nature of this dataset – which has been acquired with a mobile device – we need to shrink the bounding box after the first phase: usually, mobile devices can give bad focus with closeups so you might need to stay a bit far depending on your subject. If this is the case, remember to shrink the bounding box after the first phase in order to achieve a denser point cloud on your subject rather than on the environment.
Step 3 (optional) – Tweaking the parameters
Before discussing the parameters, here is a brief overview of the extraction process: Zephyr will split the movie in certain “window frames” where each window is a certain amount of consecutive frames – the size of the window depends on the number of the desired extracted frames. For example, if you wish to extract one frame per second from a 25 fps video file, the first window will be made of the first 25 frames – of these 25 fps (the current window), the less-blurred frame will be chosen (if the blurriness auto filtering option is enabled, otherwise the first frame will always be arbitrarily chosen) and it will be discarded if too similar to the previous extracted frame (according to the “similarity auto discard threshold” value).
Frames to extract: frame per second to be extracted. It can also be a decimal value, e.g. “0.5 fps” will extract a frame every 2 seconds.
Blurriness auto filtering: will pick the less-blurred frame if enabled, by computing a 256×256 pixels magnitude texture (fast) or 512×512 pixels magnitude texture (normal). A higher value means higher accuracy, however, this means slower computation.
Similarity auto-discard threshold: computes a score for the current frame and the previous one; if the deviation is lower than the threshold, the frames are considered too similar and the current frame is discarded.
Final notes
If you are feeding Zephyr videos from mobile devices, please consider using deep/high parameters for SfM and MVS phases as higher resolution/high quality videos will probably work with faster settings.
Moreover, if you are feeding Zephyr a mobile shot video, please consider changing the default bounding box: to get a sharp recording of the subject on a mobile device you usually need to be quite far, so closeups might require to manually adjust the bounding box to get a good dense point cloud.
The next tutorial will show how to unwrap a 3DF Zephyr generated texture using Blender. Proceed to the next tutorial.


