Tutorial #11 – Understanding points/vertices density
Understanding density
Welcome to the 3DF Zephyr tutorial series.
In this recipe, you will learn about point density, densification and decimation.
Albeit not properly a tutorial, this guide can improve the final results you get in Zephyr.
This guide is useful especially for newcomers to 3D modelling in general.
Understanding details and model quality
Intuitively, we usually think that having more points in a point cloud or more vertices in a mesh, will yield more details as there are more information that can describe a 3D geometry.
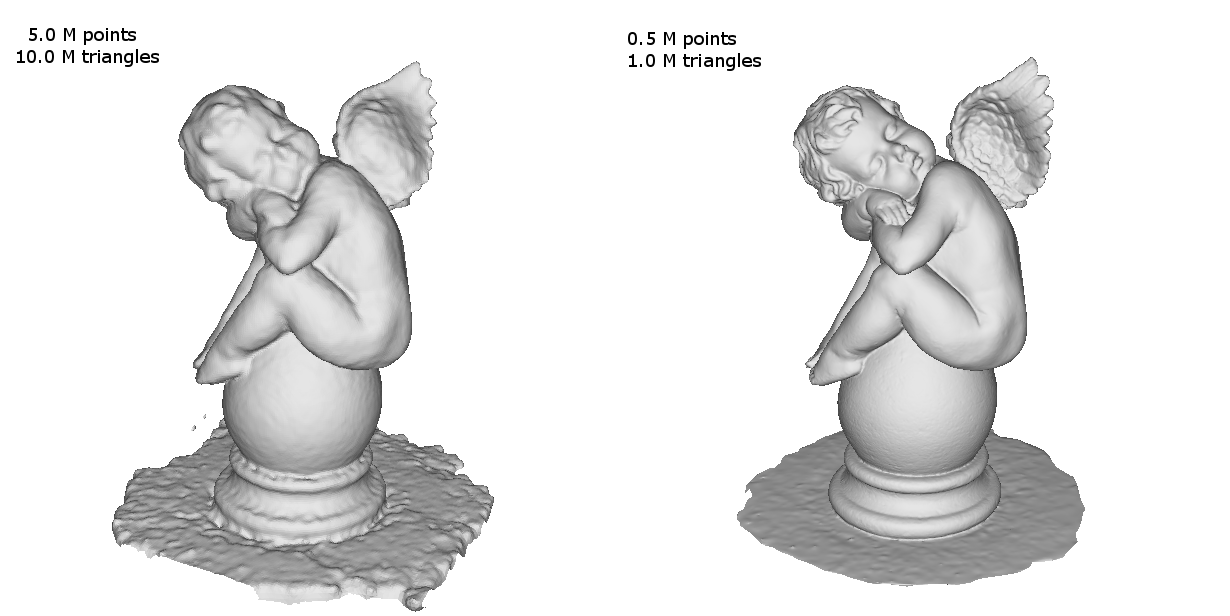
This is true to some extents: like in photography, the number of megapixels doesn’t translate directly to a picture, in 3D modelling a higher point cloud/polycount does not always translate into a better model or higher detail.
Never rely on the point cloud/polygon count alone to compare the quality of a model: you should actually have a look at the geometry itself and the level of detail reached by the two models. This is true for any model, regardless of their generation source.

General concepts
- Densification filters never add details
Using the “densify” filter never adds more detail: the points generated with this filter are interpolated and this filter must be used only to reach a target vertex count, useful for example if you want to test the asset in an engine for example, before starting to do adjustments in blender, maya, or similar software.
Generally speaking, it’s better to have less, more accurate points/polygons than many, bad/interpolated points. Always leave the densification as the last step if you really need a densified object.
If you have generated a dense point cloud or a mesh that doesn’t satisfy you with the extracted details, you should proceed with a different approach as explained below.
- Simplification and retopology can remove details
More often than not, a simplification tool will remove details. Applying the simplification tool over the whole point cloud/mesh could remove details, as Zephyr has no idea which area of interest should be decimated less due to your specific interest. In order to avoid this, either apply the filter on a specific sub-selection of your object (this is available since Zephyr 3.300) so that you can simplify only the area of the mesh that you require to. When dealing with textured meshes, it’s a good idea to create different meshes with different polycount first, and then generate a textured mesh for each generated mesh.
- A good workflow
Since most users need to get to a textured mesh, what we suggest as a general workflow is to obtain a good dense point cloud/mesh that fits your target details requirements, then use the photoconsistency mesh optimization and tune the image resolution and target reprojection area parameters to reach your desired polycount before the texture generation.
Point clouds only tips
- Always check the bounding box
The discretization level in the parameters directly influences the number of points that will be generated. Always double check that the bounding box is correct for your area of interest: if the volume is too big, the points might be scattered too far away to generate an acceptable result. It doesn’t make sense to have a huge discretization level over a huge bounding box when you can get better results with a lower discretization on a smaller area of interest.
- Increase the resolution in the advanced parameters
A direct way to increase the number of generated points in the dense point cloud generation phase is to directly increase the target resolution. Higher values will yield higher point counts, however, be wary that by doing so the noise will also potentially increase (especially with photos with micro-noise or with bad focus and/or high ISO speed noise). Always be careful and keep in mind that 100% resolution often leads to a lot of excess noise.
- Generate a mesh with the photoconsistency based optimization
If you need to stop at the dense point cloud, sometimes it could be a good idea to generate the mesh anyways. Using photoconsistency based optimization, you will get a mesh that is much more accurate. Once you have generated a mesh, you can right click it and extract a dense point cloud from it.
Mesh only tips
- Rely on a good point cloud
Either regenerate the dense point cloud with different presets or by directly adjusting the noise filtering value, or use the available tools in Zephyr to remove the noise (for example with the confidence tool or manually with the lasso or the color selection) in the dense point cloud generation if you feel your dense point cloud is not good enough, before proceeding with the mesh extraction. Feeding a bad point cloud to the meshing algorithms will usually yield a bad result.
- Use photoconsistency
The best way to increase the polycount by keeping (or even improving) the accuracy is by using the photoconsistency based optimization. Image resolution and target reprojection area directly influence the final polygon count.


