Tutorial #A11 : Fixed camera rig workflow tutorial
Fixed camera rig
Welcome to the 3DF Zephyr tutorial series.
In this recipe you’ll learn the workflow with fixed camera rig setups.
This workflow will allow you to calibrate your rig so that you can export the internals and externals parameters of all the cameras in your rig, so you can quickly load a new workspace by not computing the same camera orientation twice. This of course requires that the cameras are always in the same place.
Introduction
Why should you follow this workflow? While it is not mandatory, by following this workflow you’ll skip most parts of the SfM phase every time you are going to reconstruct a new dataset. By doing so, you’ll save a significant amount of time during the sparse point cloud generation (keypoints for example still have to be computed for each new photo).
This workflow assumes that your camera positions are always the same and never changes. For this example, we are going to use Pi3dScan’s Richard dataset – you can download it from Pi3DScan’s homepage or here :
 | Download Dataset – Richard from Pi3dScan (670MB) |
Step 1 – Create a new project / calibration setup
Create a new project like you normally would, in this case using the images in the “153894_with projection” directory, however during the camera calibration page right click on the camera list and left click “select all (1)“. Right click once again and then left click “Clone calibrations (2)“.
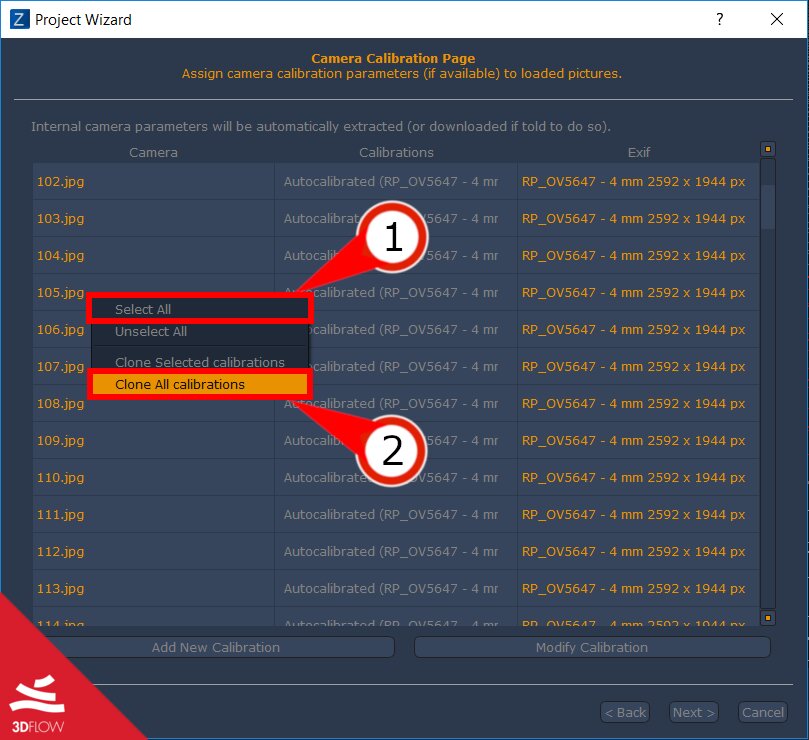
This is a required step because in this case, we are dealing with multiple, different physical cameras: even if it’s the same maker and model, intrinsics will slightly vary from one to another.
You’ll notice that each row now will show the name of the camera rather than “autocalibrated”.
Since version 3.701 you can also simply right click and then left click “clone all calibrations”.
When the sparse point cloud has been generated successfully, you can then export the camera internals and externals as .xmp files from the “Export” -> “Export cameras and points” menu by checking “Export camera intrinsics and extrinsic as xmp files“.
At this point, you can either proceed down the Zephyr pipeline or use a different photoset. For the purpose of this example, we are now going to restart the project using the photos in the “153894_for texture” directory.
Protip: if you have a fixed rig with a projector, it’s advised to use the images with the projected pattern up to the mesh phase (included) for better accuracy, and switch to the “projector off” images only for texturing from the tools -> workspace -> change workspace images menu.
Protip: Since version 3.700, 3DF Zephyr offers a streamlined process that relies on XMP files.
Step 2 – Create a new project using the same camera information
Copy the generated .xmp files in the directory of the new project (in this example “153894_for texture”). From the “File” menu select “Load photos with known parameters” and add the photos like you normally would.The wizard will skip the camera calibration page and in the summary, you should see “fixed camera ppm loaded” just before starting the new project.
After clicking Run, Zephyr will use the defined camera information.
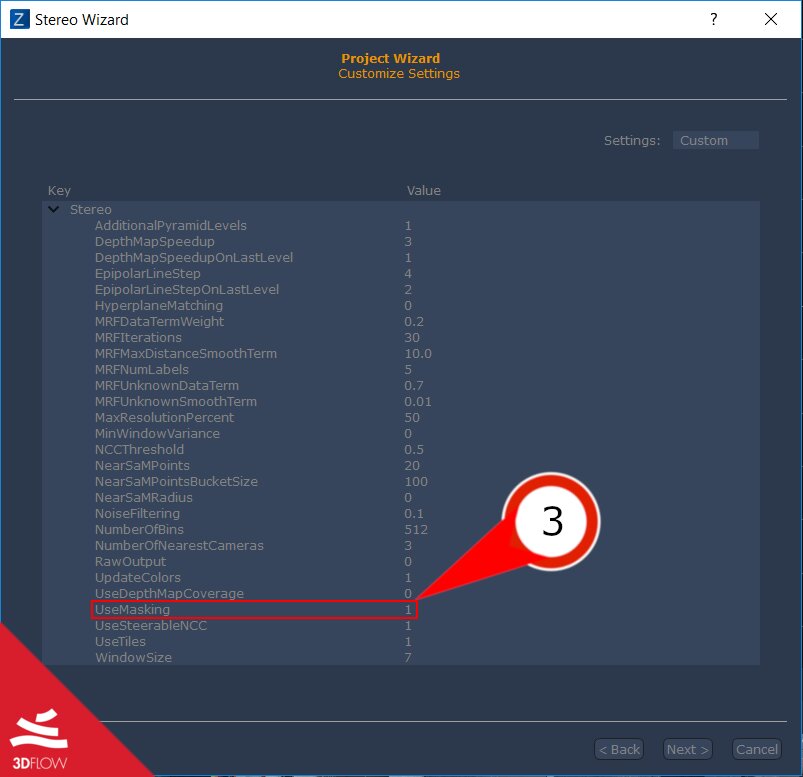
Please note that in order to load mask for later stages (i.e. in the dense cloud generation) you will have to use the “tools” -> “workspace” -> “change masks” function – make also sure if you are using custom mode that “1” is set in the appropriate parameter UseMasking (3)
Final notes
In this specific case, the correct workflow would have been to proceed and generate the mesh using the “153894_with projection” images and then use the “tools” -> “workspace” -> “change workspace images” function in order to swap the images in the textured mesh generation phase.
It’s important to understand that swapping images just for texturing can be done as a final step, while the loading photos with known parameter function should be done for completely different datasets from a fixed camera rig.