Tutorial #09 – 3DF Zephyr parameters tuning guide
3DF Zephyr parameters tuning
Welcome to the 3DF Zephyr tutorial series.
In this recipe, you will learn how to tune the advanced settings in order get the best results possible with 3DF Zephyr.
Introduction
3DF Zephyr is a powerful yet simple tool: we put a lot of effort in making it automatic and user friendly, however, this advanced guide will significantly improve both your workflow (i.e. by enabling you to save processing time) and the final result (i.e. getting a more accurate mesh). The default settings will work for most cases, but you can always get a better result.
Before going into the actual parameters tuning guide, we need a deeper understanding on what is happening under the hood. The typical 3DF zephyr workflow is composed by these phases
Step 1 – Structure from motion (New Project Wizard)
Step 2 – Multiview Stereo (Dense point cloud Generation)
Step 3 – Surface Reconstruction (Mesh Generation)
Step 4 – Textured extraction (Textured mesh generation)
Different settings in each phase can have a huge impact in the phase itself and its following phases as well. Keep this in mind: if a phase result looks good, there’s a good chance the following one will be good as well. However, if you’re having odd results in a phase, you might want to tinker with the settings and re-run the phase before going further down the pipeline. We will now go through each phase and understand what can be changed to achieve better results.
This guide focuses on the advanced settings.For a the custom/XML parameters guide, follow this link.
Step 1 – Structure from motion
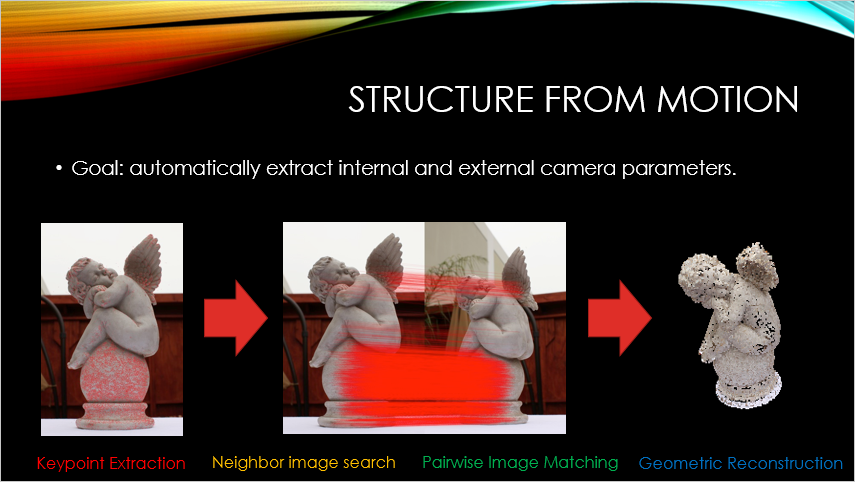
The goal of the structure from motion phase is to automatically extract internal and external camera parameters (long story short, these parameters are data needed by 3DF Zephyr to adjust the input depending on the camera objective, rotation and translation). This phase can be further divided into four steps:
Keypoint extraction
Pairwise image Matching
Neighbor image search
Geometric Reconstruction
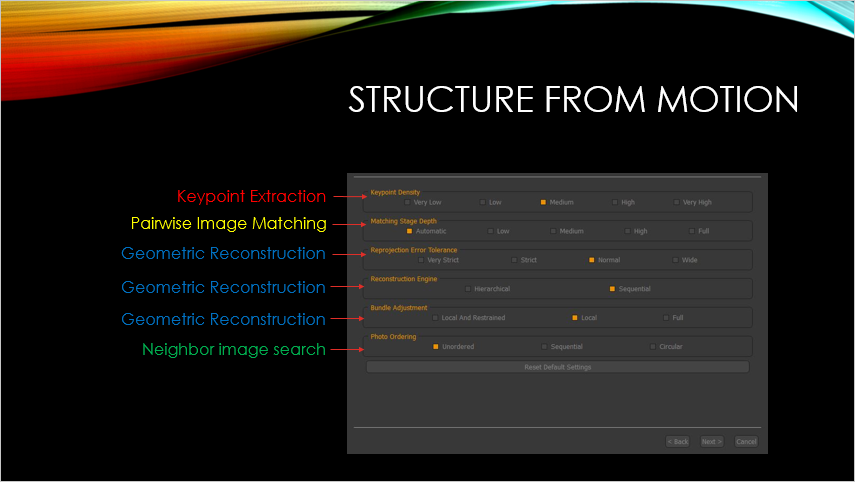
When presented with the “new project” wizard, you have the chance to change the behaviour on each one of these sub steps.
As you can see, the structure from motion phase will first extract the feature of each image (keypoint extraction); after that, Zephyr will go through the images to understand for each image which other images are connected via overlapping (neighbor image search).
Once that is done, Zephyr will need to understand, for each point in each image, where these points are located in other images: when all this is done, the actual geometric reconstruction can begin. We can operate on each one of these steps for the best result possible.
· Keypoint density (Keypoint extraction)
Keypoints are specific points in a picture that zephyr can understand and recognize in different pictures. The more doesn’t always mean the better, as more points means more ambiguities during the matching phase. The keypoint density also controls the scale of points (points with higher scale are extracted, thus increasing the probabilty to match distant photos to closer ones)
Very Low: will extract up to 5000 keypoints per image
Low: will extract up to 7500 keypoints per image
Medium: will extract up to 10000 keypoints per image
High: will extract up to 15000 keypoints per image
Very High: will extract up to 20000 keypoints per image
– Decrease When
»» you need fast processing
»» You are not varying much the distance between the cameras and the subject
»» You have many overlapping photos
+ Increase When
»» Cameras have not been correctly oriented
»» You have photos in the same dataset that are close and distant to the subject
»» You have few photos, not overlapping or that have uniform textures
· Matching type
Controls which optimizations (if any) should be used when computing matches between images. Increase or decrease accordingly depending on the desired accuracy versus speed.
· Matching stage depth (Pairwise image matching)
Controls how many pairwise image matching to perform. Usually, the more is the better, however, this comes at a computational cost.
Low: at least 2 * number of images
Medium: at least 4 * number of images
High: at least 10 * number of images
Full : (number of images * number of images – 1 ) / 2 (ALL couples, O(N^2)
– Decrease When
»» you need fast processing
»» You have many overlapping photos with good texturing
+ Increase When
»» Not all cameras have been oriented
»» You have few photos, not overlapping or uniform textures
· Photo ordering (Neighbor image search)
If you know the photo ordering, you can skip the neighbor search phase (improving speed and accuracy). If you don’t know the photo ordering, pick “unordered“. However, if you took the pictures in a sequence or in a circular motion pick respectively “sequential” or “circular” (the circular sequence is intended as a closed loop sequence). The “Approximate grid” assumes neighbors in a certain limited set.
· Reconstruction Engine (Geometric Reconstruction)
You can tell Zephyr how cameras have to be reconstructed. With sequential, cameras are reconstructed one by one, growing a cluster of cameras, while if you pick global, cameras are reconstructed in 1 single step.
The global pipeline scales very well when there are a lot of cameras and in some cases can help with “drifting” errors.
Nevertheless, the incremental pipeline can sometimes guarantee a lower level of discarded cameras in some cases.
· Bounding box with outliers rejection procedure (Geometric Reconstruction)
When enabled, a robust method will be used for discarding far points during bounding box computation. When disabled, all the sparse points will be used.
Step 2 – Multiview Stereo
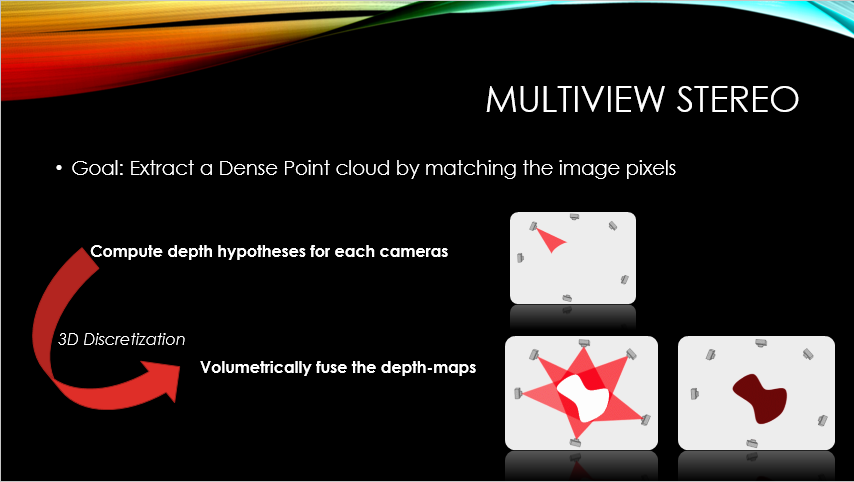
The goal of the multiview stereo phase is to extract a dense point cloud by matching the image pixels. As you already understood, this is what is happening during the “dense point cloud generation” phase.
It’s important that what we input to each phase is a good starting point. If you think that the output from the structure from motion phase can be improved, you might want to change the settings and try again. This come both with picture shooting experience and 3DF Zephyr experience. After a while, you will understand which parameters you should change to get better results in each phase!
| MVS tuning option | Description | Hint |
| Output type | Controls wheter to use raw data or refined data. | Use raw when »» you just want the raw dense point cloud with no automatic post processing whatsoever Use refined when |
| Number of nearest cameras | Controls the number of near cameras used to comput each depth map | – Decrease When »» You don’t have many overlapping photos »» You need fast processing + Increase When |
| Resolution | Controls the input image resolution. Eg, if the input image is shot at 4000×3000 pixels, if the resolution is set to 50% images are then rescaled to 2000×1500 pixels for processing. Not always the more the better: sometimes resizing the images can lead to better results as jpegs or camera artifacts may be present at pixel level. | – Decrease When »» You need fast processing + Increase When |
| Noise filtering | Removes noise from the result by discarding weak 3D points. This value controls how much the noise filter influences the point cloud creation. A low value will produce a denser cloud but more likely to contain more noise. | – Decrease When »» the final results lacks parts + Increase When |
| Speed up level | Controls the depth map speed up during the depthmap computation. The speedup is achieved by preemptively discarding redundant pixels from the computation. | – Decrease When »» You favor details over speed + Increase When |
| Hyperplane matching | This novel algorithm uses a more accurate matching function. Turn this off to increase speed, but potentially lose some details. | Disable when »» You favor speed over details Enable when |
| Cameras preselection | Turn on to use only a pre-selection of cameras for the depthmap computation. When enabled, the computation will take less time but potentially lose some details. | Disable when »» you favor details over speed Enable when |
| Shape from silhouette | Controls the shape from silhouette (voxel carving) settings. Masks are obviously required for this option to be enabled. SfS can output the point cloud directly or use the resulting point cloud as intitalization for the MvS step. Usually, looseness should be left to 0. | – Decrease loseness when »» You want to be more strict about the masks coherence + Increase loseness when |
| Update colors | You can skip coloring the point cloud if you do not need a colored point cloud or if your end product is not a dense point cloud. If your end product is a textured mesh, you can disable update colors to compute faster. | Disable when »» you do not need color on the point cloud Enable when |
Step 3 – Surface generation
As you probably already imagined, this next tuning step is about the surface generation (the mesh extraction from the dense point cloud).
We can tune the surface generation by acting on parameters of the surface generation algorithm itself and on the parameters required in the post processing step.
| Mesh creation option | Description | Hint |
| Smoothness | Set the smoothness level of the output mesh (before photoconsistency) | – Decrease when »» You want a sharp output ( e.g. sharp corners of a building ) + Increase when |
| Watertightness | Set the watertightness level of the output mesh. | – Decrease When »» You need a less watertight mesh + Increase When |
| Use masks during mesh reconstruction | If masks are available, they can be used also during the mesh extraction. | Disable when »» You do not want the masks to interfere with the mesh generation process Enable when |
| Update colors | You can skip coloring the mesh if you do not need a colored mesh or if your end product is not a mesh. If your end product is a textured mesh, you can disable update colors to compute faster. | Disable when »» you do not need color on the mesh Enable when |
| Photoconsistency based optimization | Controls the photoconsistency based mesh optimization parameters. Make sure to check the photoconsistency tutorial for more information on the photoconsistency parameters. |
Step 4 – Texture and ortophoto generation
Both these procedures share similar parameters (as it is an Inverse mapping from 3D to image pixel) and are driven by the desired size of the ortophoto/texture. Since the color information for each pixel comes from different sources/cameras you can always specify the maximum number of cameras used for the computation.
Color balancing is automatically computed but if you’re unhappy with the results you can control its strenght.
You can eventually enable the experimental weighting feature, which allows to weight more sharp part of the images vs blurred part of the images (blurriness weight) or the photoconsistency weight (which can be useful when there are moving objects in the scene, for example cars from aerial datasets).
Final notes
This guide should have given you enough insights on how 3DF Zephyr works under the hood. Feel free to use the forum to ask further questions if you need clarification!