Tutorial #A14 : How to use the Ground Extraction filter and the AI Classification
How to use the Ground Extraction filter and the AI Classification Tool
Welcome to the 3DF Zephyr tutorial series.
In this tutorial, you will learn how to use the Ground extraction and AI classification tools on meshes and point clouds generated with 3DF Zephyr. Please note: this tutorial cannot be completed using the Free or Lite versions of 3DF Zephyr.
Summary
Introduction
The Ground Extraction filter enables the extraction of Digital Terrain Models (DTMs) directly in the 3D workspace. The AI Classification tool, on the other hand, allows for point cloud segmentation based on object categories defined by the user. These tools provide advanced options for processing and organizing 3D data in 3DF Zephyr.
How to extract the ground from a 3D model
The Ground Extraction filter allows you to automatically isolate the terrain — classified as Ground — from other elements such as trees and buildings, which are considered Non-Ground.
This process can be applied to both point clouds and meshes, and it is typically used to generate Digital Terrain Models (DTMs) by removing non-terrain features.
From the Editing tab > Filtering section > select the “Ground Extraction” button to open the tool.
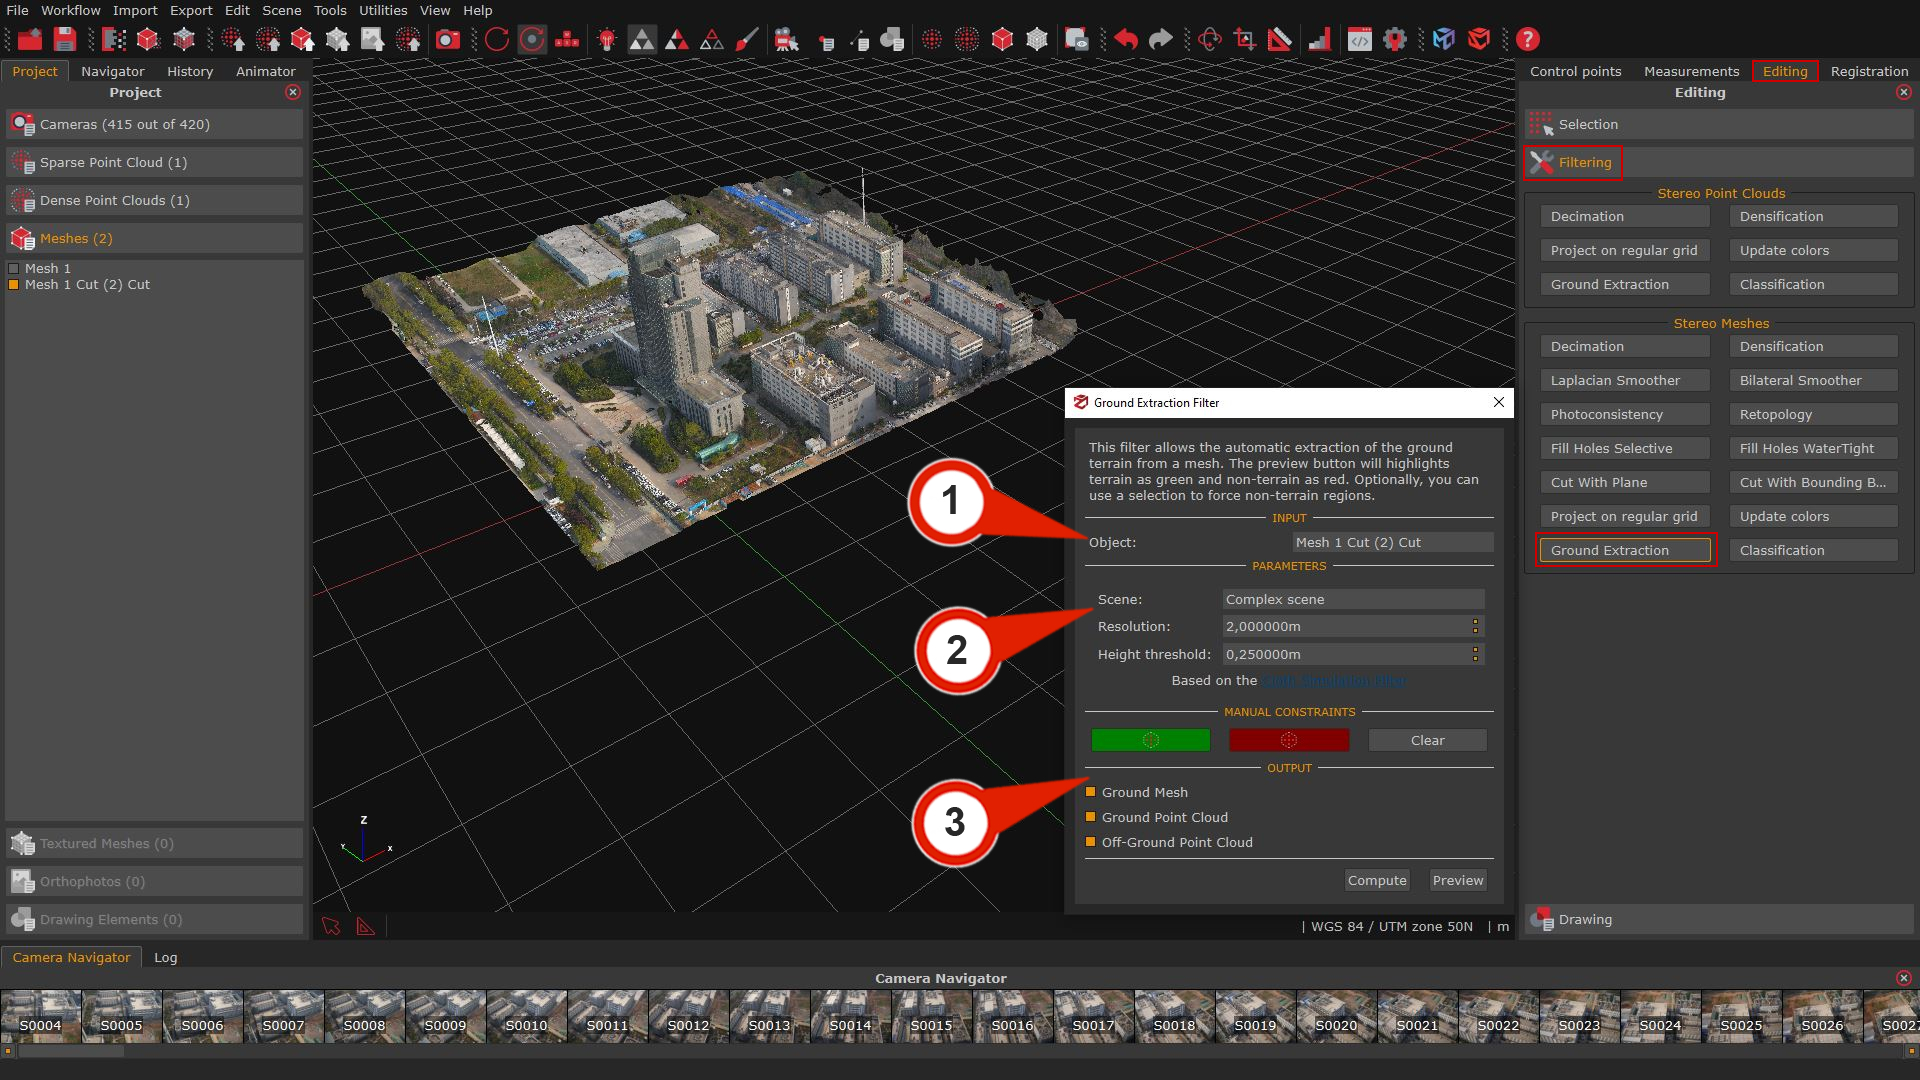
In the “Input” section, choose the Object (1) to process either a dense point cloud or a mesh previously generated in your project.
In the Parameters (2) section, you will find the following options:
- Scene: This drop-down menu lets you choose the type of scenario that has been reconstructed in 3D. Available options are Complex scene, Mountain area with dense vegetation, and Flat terrain with high-rise buildings.
The selected option determines how the algorithm deals with terrain features. - Resolution: Defines the grid size of the virtual “cloth” used to simulate terrain coverage.
A higher resolution results in a less detailed DTM. - Height Threshold: Sets the distance used to classify points as either Ground or Non-Ground, based on their vertical separation from the simulated terrain surface.
Note: This parameter depends on the project’s reference system and measurement units.
The Output (3) section allows to select the desired 3D object that will be created with the Ground extraction filter:
- Ground mesh
- Ground point cloud
- Off-ground point cloud
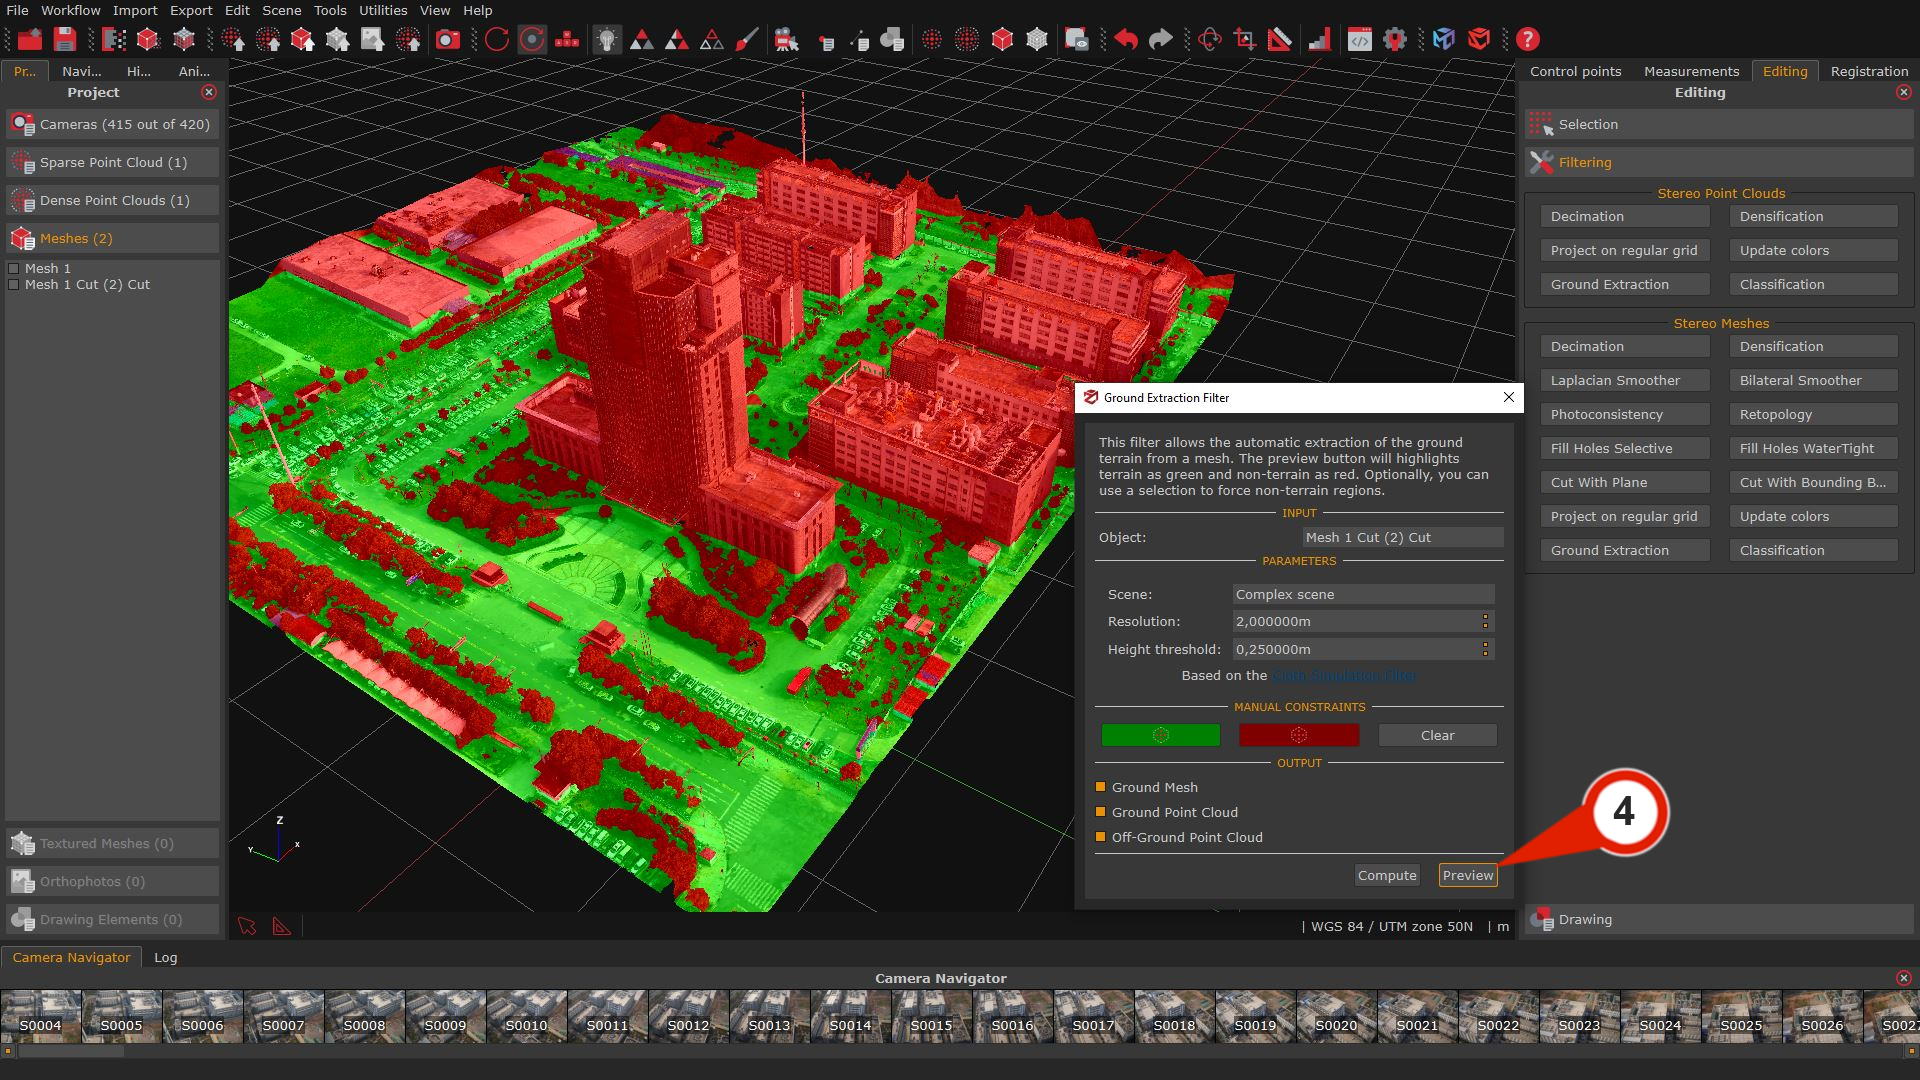
Click the Preview (4) button to see a quick preview in the workspace, where the model is divided into Ground and Non-Ground areas.
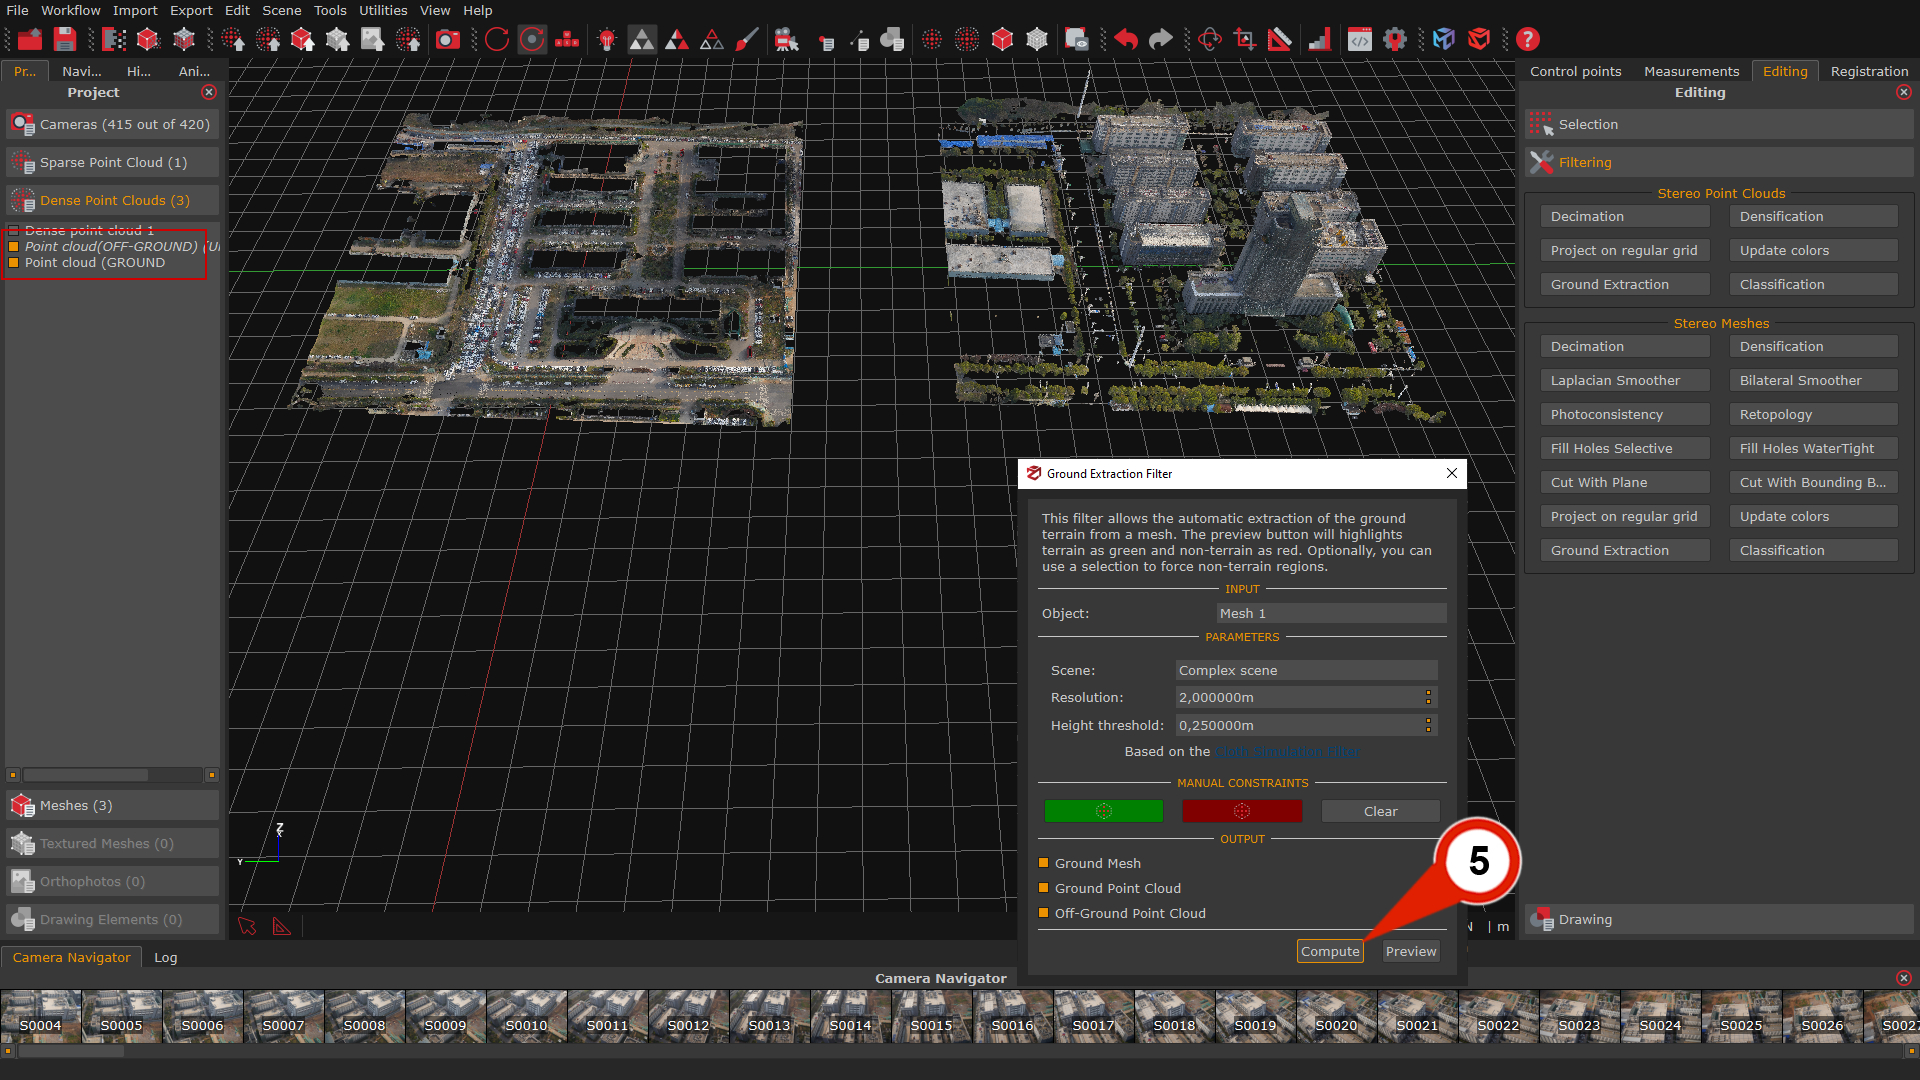
Clicking the “Compute”(5) button will finalize the ground extraction. The resulting Ground mesh, the Non-ground point cloud and the Ground point cloud will be listed in the Project tab and visible in the 3D Workspace.
Manual editing
Once the preview has been generated, manual refinement can be performed to enforce or override the automatic classification of Ground and Non-Ground areas within the selected point cloud or mesh.
– The Green button button activates polygonal selection mode for manually designating regions as Ground.
– The Red button enables polygonal selection of regions to be classified as Non-Ground.
– The Clear button removes any manual overrides previously applied, restoring the default classification in the affected areas.
The AI classification tool
The AI Classification tool automatically identifies and segments semantic categories within a 3D scene. Users can choose among three predefined classes: buildings, roads, and high vegetation (Trees). Please note that this tool is specifically designed to operate on dense point clouds and meshes generated from aerial datasets.
The classification process internally includes the Ground Extraction filter, which is enabled by default to improve terrain separation during object segmentation.
Upon completion, 3DF Zephyr will automatically generate and append new 3D model layers for each enabled category in the Project tab. This allows users to efficiently visualize, manage, and export classified data within the workspace.
Note: 3DF Zephyr will download the required machine learning models during the initial use. Therefore, an internet connection is necessary.
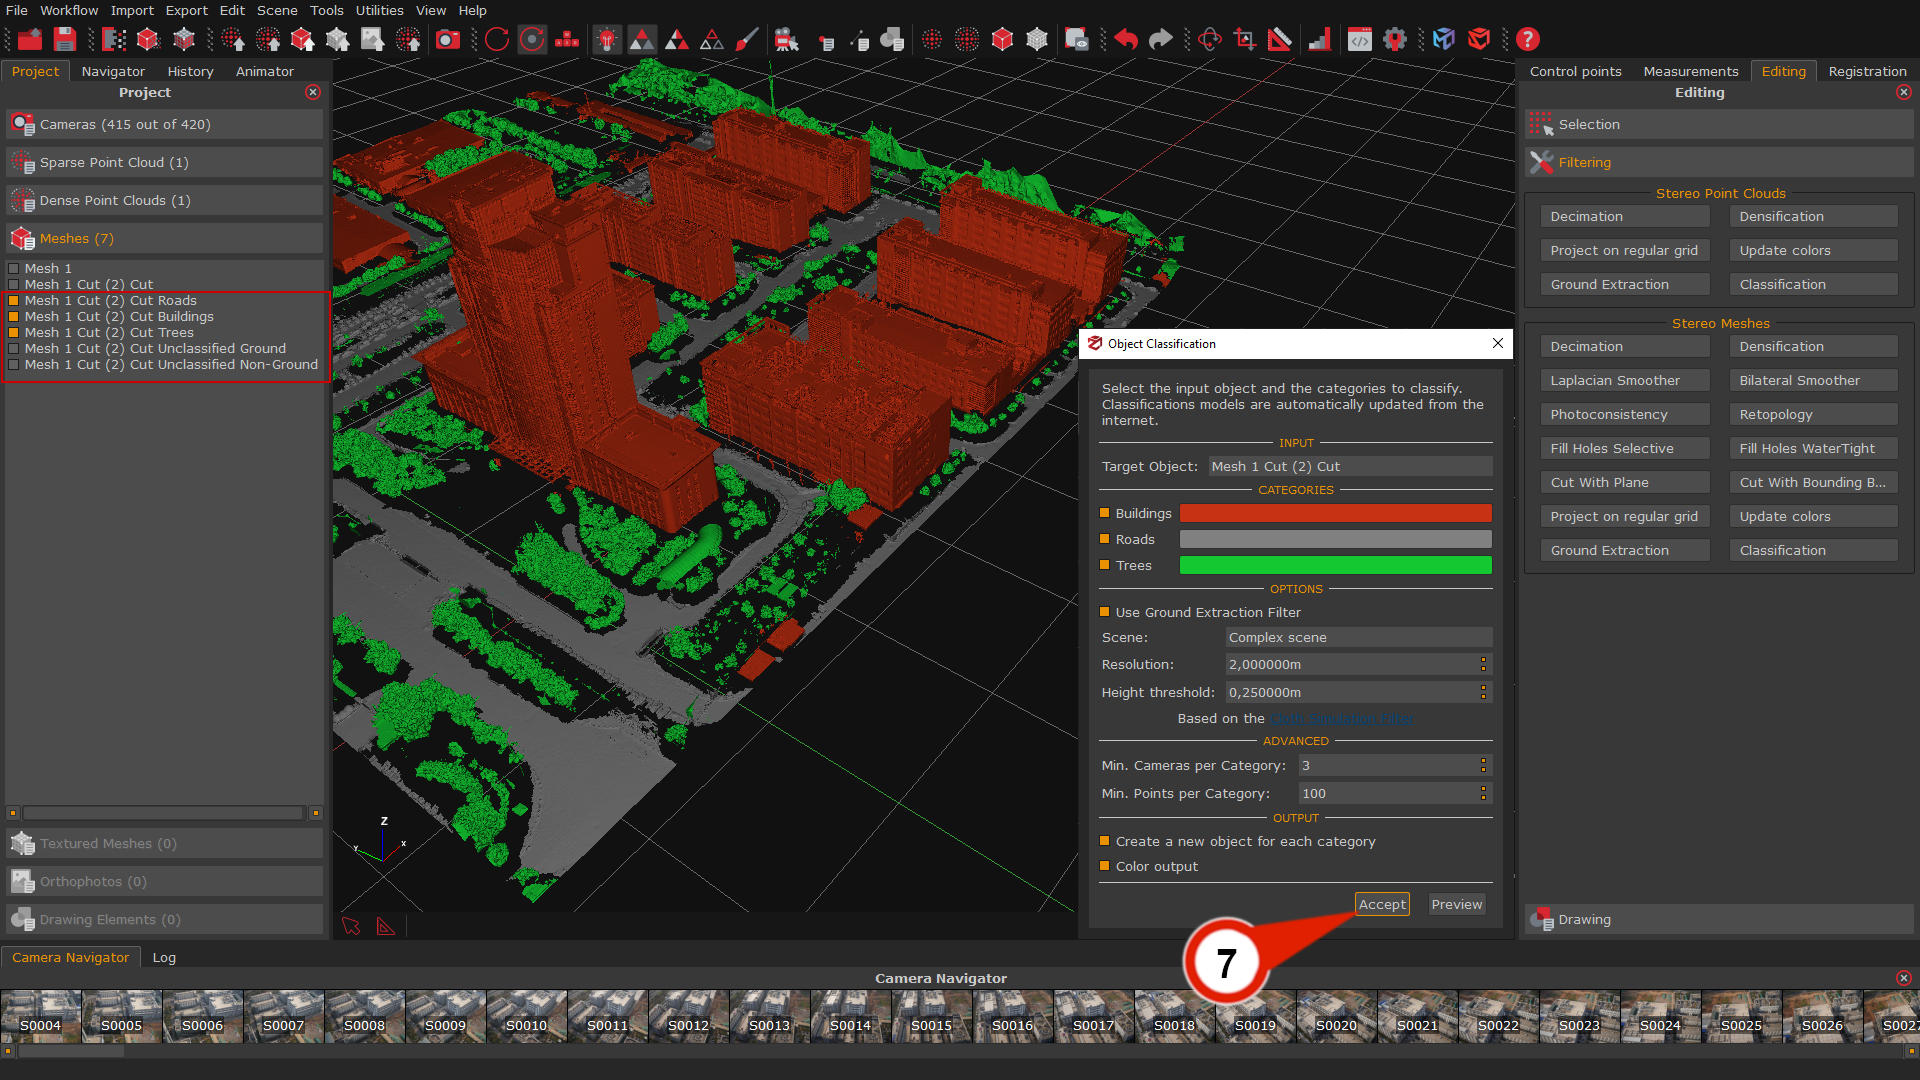
The Classification tool can be launched from the Editing tab (right panel) by clicking on the “Classification” button within either the Point Cloud or Mesh section, depending on the input data.
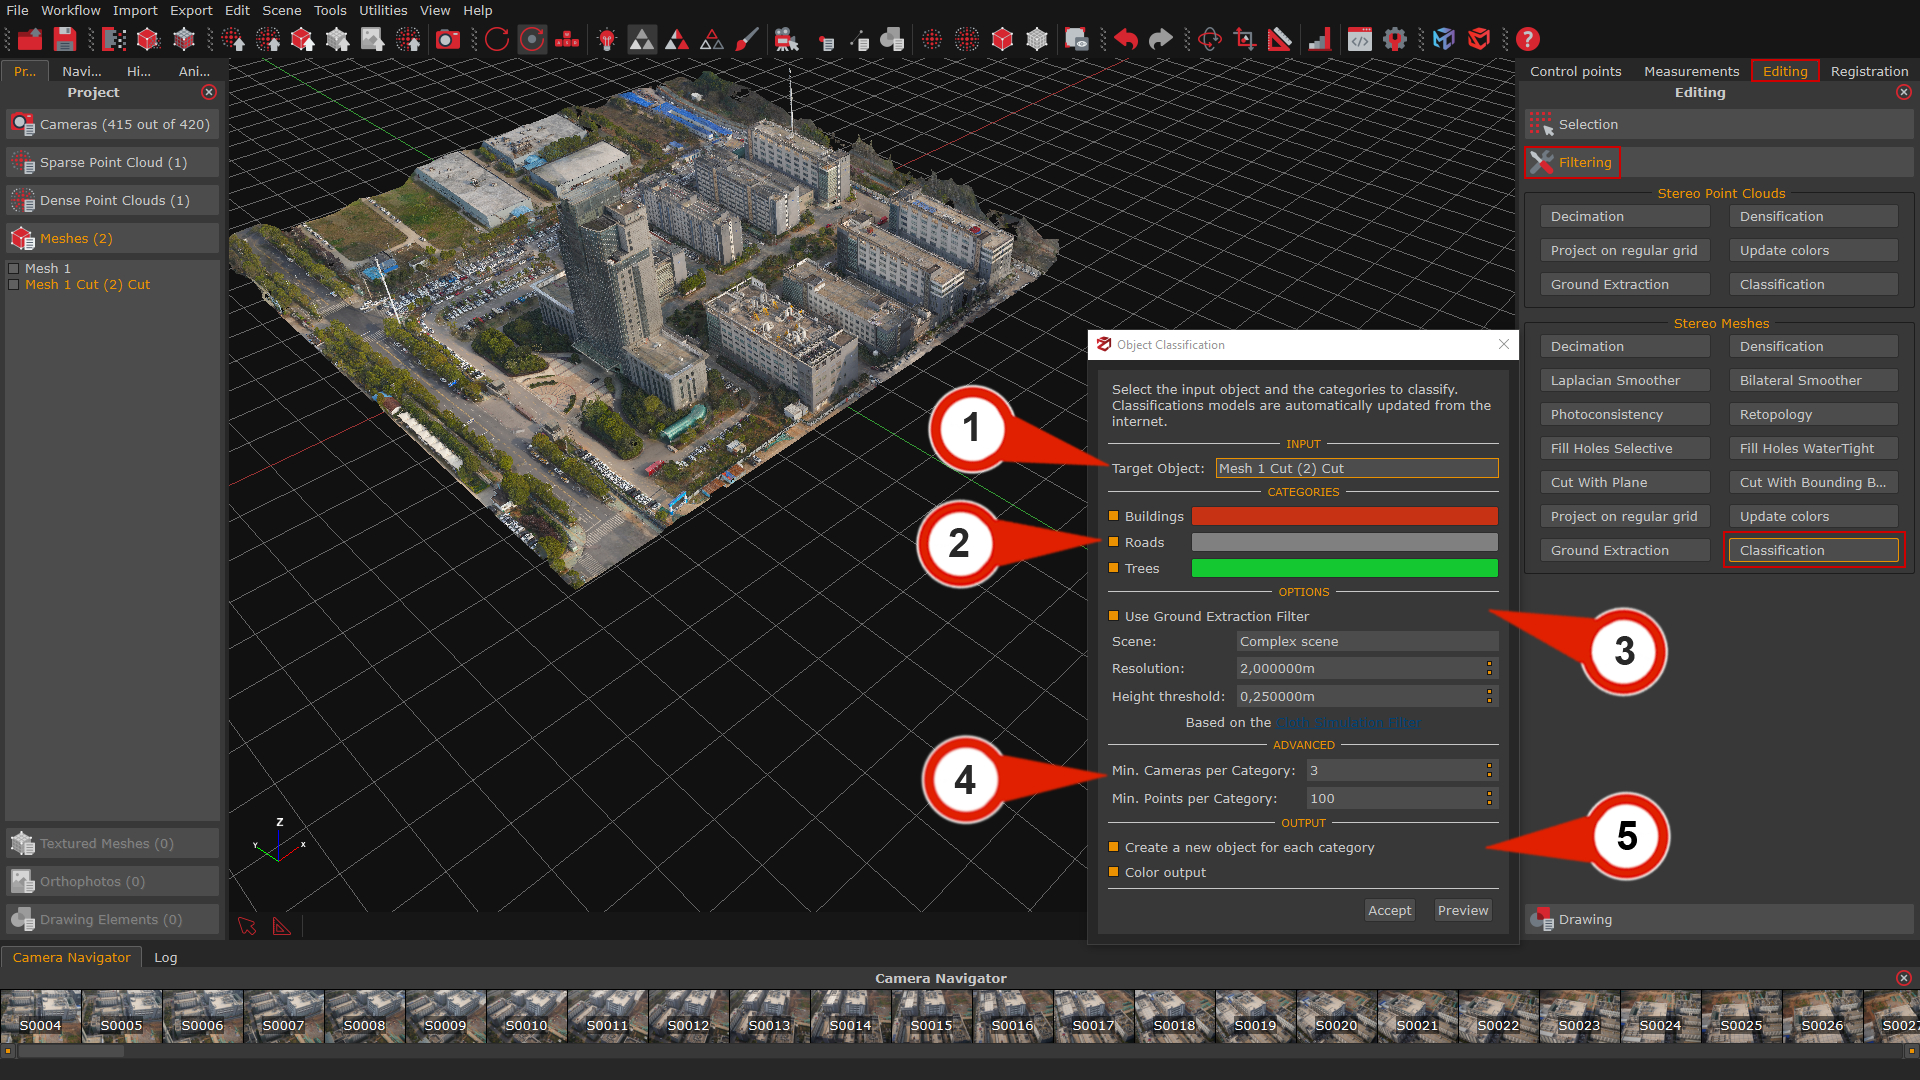
Once opened, the Object Classification window displays the following configuration sections:
- Input section (1): Selects the target object from the list of available point clouds or meshes to be processed.
- Category section (2): This section allows the user to enable or disable individual object classes to be extracted. Each class can also be assigned a custom display color by clicking on the respective color swatch.
- Options section (3): This section contains the Ground Extraction parameters, which are active by default but can be disabled if desired.
Advanced section (4): This section provides control over filtering thresholds for classification, increasing either value reduces noise and discards smaller, less reliable segments:
– Min. cameras per category: Sets the minimum number of camera observations required for a point to be considered valid for classification.
– Min. points per category: Defines the minimum number of points needed for a class to be retained in the output.
Output section (5): This section provides options for managing classification outputs:
– Create new object for each category: When enabled, Zephyr will generate separate objects for each selected class.
– Generate color output: Optionally generates a colorized version of the classified result for visual inspection.
Clicking the “Preview” (6) button will visualize the classification results within the 3D workspace, allowing the user to double-check the parameter settings before final processing.
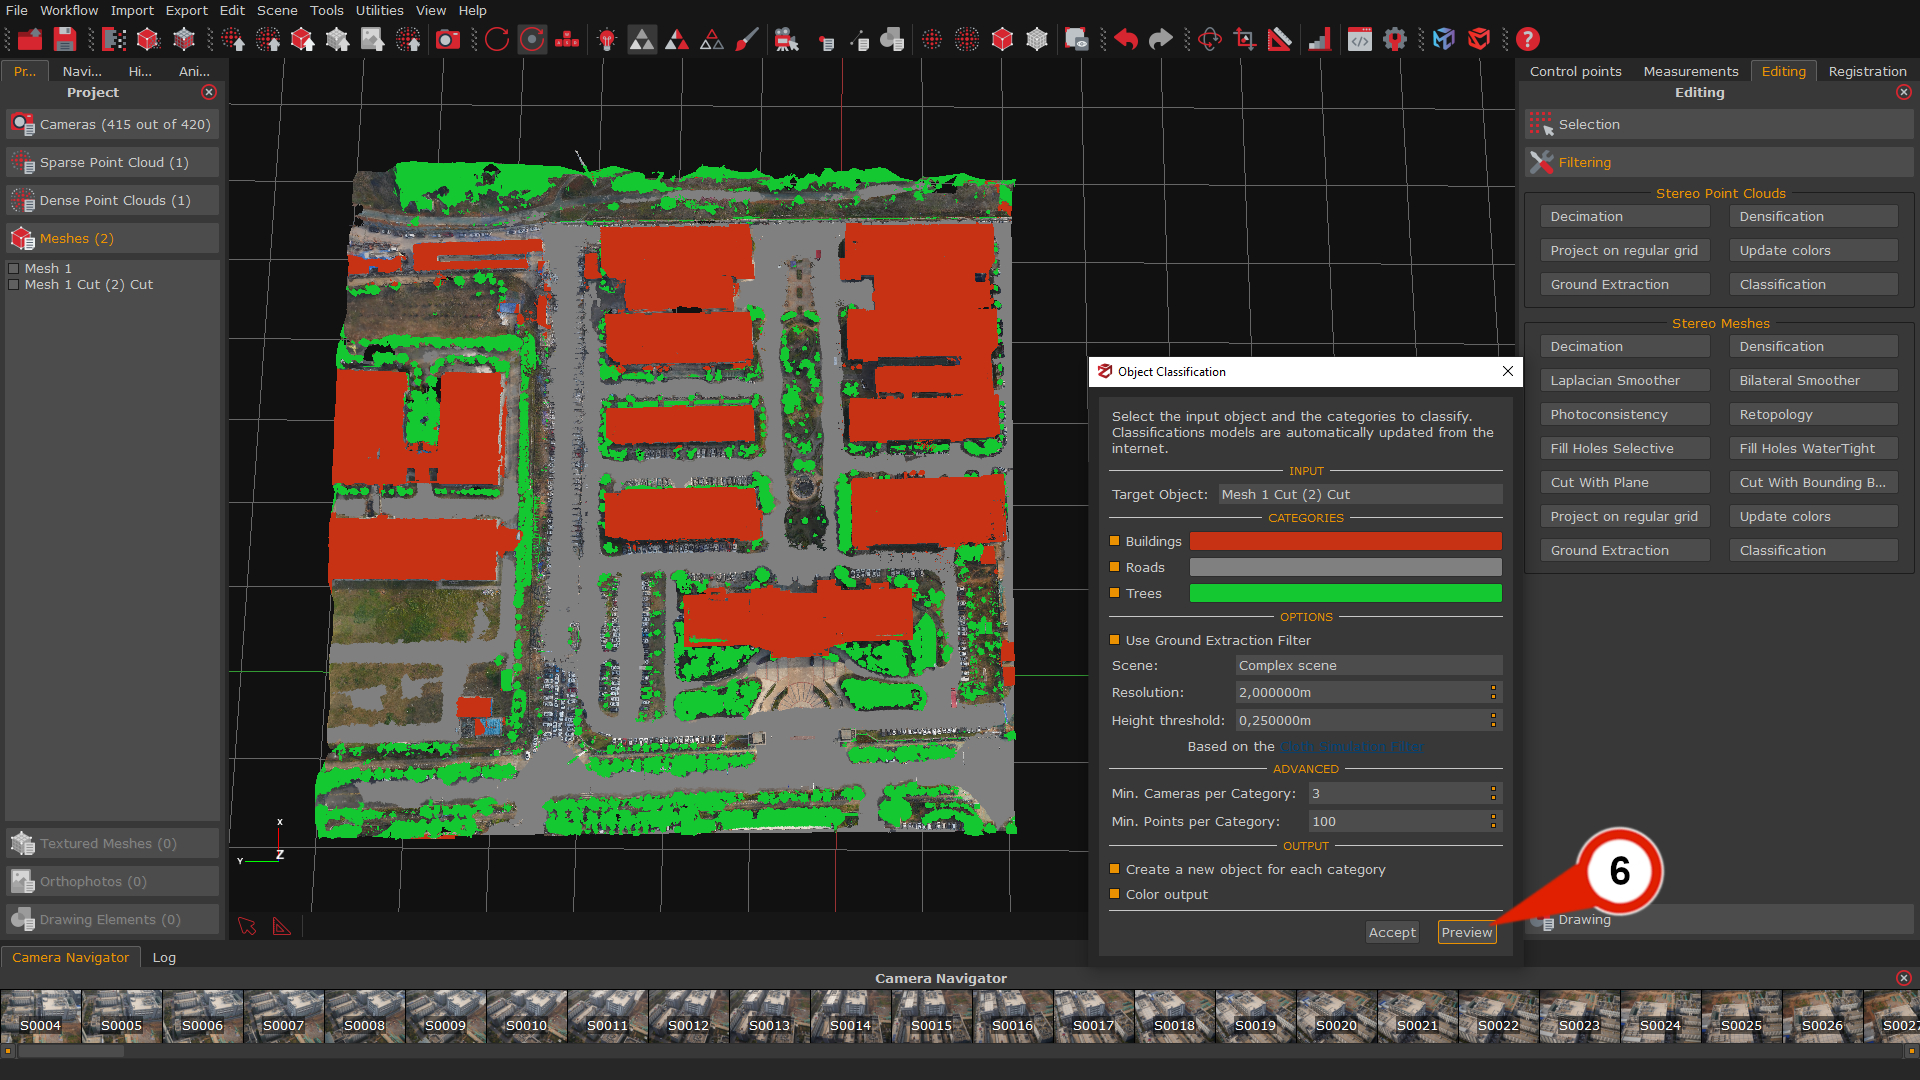
Once all parameters have been configured, clicking the “Accept” (7) button will start the classification process. The AI Classification tool will then process the selected input and create separate objects for each enabled category.
The resulting classified objects are automatically listed in the Project tab and can be directly visualized and refined in the 3D workspace.